Showing posts with label PaperArsty. Show all posts

Wednesday, 11 May 2016

FREE CRAFT DEMO DAY...SAVE THE DATE... Sunday 26th June 2016

Craft Demo Sunday - SAVE THE DATE IN THE DIARY!

Sunday 26th June 2016

Free Craft Demo Day, 12pm to 3pm at the shop in Wanstead.

Details of what we will be doing will follow but this is not a demo to be missed!

Refreshments will be served.


We look forward to seeing you.

84 Nightingale Lane, Wanstead, London E11 2EZ    
Telephone: 020 8530 1244

Monday, 2 May 2016

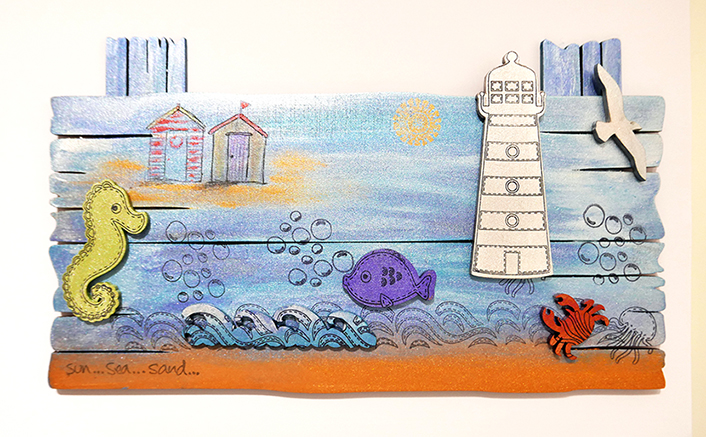
'Nautical But Nice' Workshop...Look What We Made....

This month's craft workshop theme was 'Nautical But Nice' and it was very nautical. We held the same workshop over two nights on Wednesday and Thursday of last week. We had a huge turn out again this month which was great and everybody said that they had a really wonderful time. Thank you to everybody that attended, the variations in everybody's piece of work looked fantastic. 
We used the brand new Cosmic Shimmer Gilding Polishes (they are fab!), they are easy to use and blend together beautifully. We also used the By The Sea MDF Driftwood, MDF Accessory Pack (this contains the boats, fish, lighthouse etc.) and Clear Stamp Set all by Creative Expressions. 
Below are pictures of what was made on the night. There are lots of photographs we hope you enjoy looking through them.

Lyn and Dan
x x


The piece in the photograph above was done using PaperArtsy chalk paints. They also blended beautifully.


Friday, 1 April 2016

'In The Frame' Workshop....Look What We Made....


Photograph World© Geoff Wilkinson 
The crafty frame in the photograph above was the theme of our craft workshop that we held on Wednesday evening. We had a huge turn out on the night which we was great and everybody said that  they had a really wonderful evening. Thank you to everybody that attended, the variations in what everybody did looked brilliant.
We used lots of PaperArtsy paints and dies from Wild Rose Studio, along with Phill Martin background papers.
Below are pictures of what was made on the night. There are lots of photographs we hope you enjoy looking through them.

Lyn and Danielle
x x


Wednesday, 24 February 2016

'I LOVE CRAFT' Demo Day....


Photograph World© Geoff Wilkinson 

Thank you to everybody that attended our 'I Love Craft' Demo Day on the 14th of February. We had a great time demonstrating some hot foil techniques as well as some heat embossing techniques, the PaperArtsy paint brayer technique and stamping and colouring on wood using Crafter's Companion Spectrum Noir pencils and pens, as you can see in the pictures. As it was Valentine's Day, there was lots of chocolate to eat as well!

Lyn and Dan
x

Photograph World© Geoff Wilkinson
Photograph World© Geoff Wilkinson 

Tuesday, 23 February 2016

First Craft Workshop of 2016.... Making Your Mark!


Photograph World© Geoff Wilkinson 


Our first workshop of the year was held at the shop on Wednesday the 27th of January. It was an evening workshop and everybody said they had a great time. It was an evening dedicated to making Crafty Bookmarks and the end results from everybody were beautiful as you can see in the picture above and those below. We wanted to say a big thank you to everybody that came on the night, we had a great time too.

Lyn and Dan


x

So what products did we use? Well the rubber stamps were all from PaperArtsy designed by Jo Firth-Young and Lin Brown to name a few designers and also from Indigoblu. The backgrounds were created using Tim Holtz Distress Inks and the stamped images were coloured in using a combination of PaperArtsy paints and Crafter's Companion Spectrum Noir Pens. 


Photograph World© Geoff Wilkinson 

Photograph World© Geoff Wilkinson 

Sunday, 31 January 2016

Free Craft Demo Day... 'I LOVE CRAFT' ... Sunday 14th February 2016

Craft Demo Sunday - ' I LOVE CRAFT'

Sunday 14th February 2016

Free Craft Demo Day, 12pm to 3pm at the shop in Wanstead.

We will be showing you a variety of techniques which you can do on all your craft projects, including Hot Foils. 


You will get a chance to see new craft products launched in 2016 that we are now stocking in the shop, including stamps, stencils and paints from Stampendous!, Dreamweaver, PaperArsty and lots more.... 

This is not a demo to be missed!

Refreshments will be served.


We look forward to seeing you.

84 Nightingale Lane, Wanstead, London E11 2EZ    
Telephone: 020 8530 1244

Sunday, 27 December 2015

'Tis the Season' Look what we did!


Photograph World© Geoff Wilkinson

In November we had a Christmas Decoration Making Workshop and although a little late with showing you what we did on the day, this weekend is the perfect opportunity to show you. 

We had a great day with lots of tea and cake, including some mince pies to get us in the festive spirit!

Using PaperArtsy chalk paints, rubber stamps, WOW embossing powders and lots of glitter, some beautiful Christmas decorations were produced.

We hope you enjoy looking at the photographs, look out for our workshops and demo days in 2016!

Lyn and Dan
x x
Photograph World© Geoff Wilkinson
Tip: The picture above shows some of the decorations drying in between coats of paint. Each decoration had two coats of paint sanded lightly in between each one, before decorating with the stamps, embossing powder and glitter.


Photograph World© Geoff Wilkinson

Thursday, 16 July 2015

I'll Bee Back….

 Photograph World© Geoff Wilkinson - Design World © Lyn Wilkinson All Rights Reserved


Well I did say I would be back with the Triple Decker, Double Stamping technique and here I am. I absolutely love the bees at the moment, they are so 'Summery'!

The card in the photograph above is made out of black card stock and as you can see there are three layers of a white card on top which is smooth white 300gsm. The black card has also been used to create the borders for each of the white layers and I think it frames them really well. All the layers were stuck down using a Crafters Companion Extra Strong Permanent Glue Tape, which is an easy to use double sided adhesive.

I used a PaperArtsy Stamp Set, JOFY Collection 30 from Jo Firth-Young. I used the honeycomb effect stamp first as the background which I used with a Rangers Archival Ink Pad in 'Potting Soil'. I stamped first on paper then on the white card. This made the background lighter to really bring out the bee stamp image, I used a Rangers Archival Ink Pad in 'Jet Black' to stamp the bees. The 'bee happy' sentiment is also stamped in the black and I did this last so not to smudge anything else.

To get the stamped effect on this card, you temporarily stick all the white layers of card together and then do the stamping. Once done you then put the black layers of card inbetween. You need to make sure that you line the card up so that the image looks continuous.

I coloured the bees with two PaperArtsy Fresco Finish paints, 'Yellow Submarine' and 'Tango' using a water brush which allows you to blend the paints beautifully together. I think the bright colours against the stamped background and bees works really well, as it creates a real contrast.

I hope you have enjoyed tonight's project. We have had some nice feedback from people who have seen it in the shop.

Happy Crafting!
Dan
x

P.S, Look out over the weekend for posts on new products we have in the shop and yes some of them are Christmas related! 

I also wanted to let you know that September is going to be Crafting Month at the shop in Wanstead. Look out for details on free demos, make and takes, workshops and lots more where you will have the opportunity to learn new techniques and see new products. We will also be showing you some techniques that customers have asked to see and have a go at again. 


Friday, 10 July 2015

You're the bees knees!


Photograph World© Geoff Wilkinson - Design World © Lyn Wilkinson All Rights Reserved

Take one PaperArtsy Stamp Set, JOFY Collection 30 from Jo Firth-Young and a WOW! Embossing Powder in Metallic Gold Rich and look what you get. A card which I think is simple in design but really quite beautiful. I used two rubber stamps from the collection, the large bee and one of the sentiments. It really is a great stamp set as it reminds me of Summer!


The base of the card is made from a beige/brown card, I think you can see the colour of the card better in the second picture. I stuck a piece of  'Milk' coloured Foundation card from Creative Expressions to the inside of the card using scotch double sided tape, so that the writing would show up and used a matching cream envelope.


 Photograph World© Geoff Wilkinson - Design World © Lyn Wilkinson 
All Rights Reserved


I used a Woodware Magic Anti-Static pad and rubbed it all over the card which is used to help eliminate smudges and fingerprints on the card. I have to be honest and say we use this every time we heat emboss. Next I used a VersaMark Watermark Stamp Pad to stamp the bees and the sentiment and I started with the bees from the top doing one or two at a time. So I stamped, sprinkled the embossing powder, removed the excess and then used the heat tool, then repeated the process until all the bees were done. I did the 'You're the bees knees!' last as I didn't want to smudge anything!
                                           
Happy Crafting!
Dan
x


Saturday, 30 May 2015

Free Demo Day Sunday the 31st of May 2015

Sunday the 31st of May 2015

FREE DEMO DAY
(At our shop in Wanstead)
12.00pm to 3.00pm 

Come along and join us for an afternoon 
of everything crafty!

We will be showing some of the latest
products, plus demonstrating techniques
with samples to share.

Tea, Coffee and Cake!

For further information call the shop
on 0208 530 1244

The shop address is 84 Nightingale Lane, Wanstead, London E11 2EZ.

Friday, 15 May 2015

PaperArtsy Is The Bee's Knees….

                             Design and photograph World © Lyn Wilkinson - All rights reserved


Firstly I have to apologise for this post going out later tonight that I said it would on Tuesday's post, but we have been very busy bees (I know, I know, not a great joke). 

We have lots of lovely suppliers at Craft Boutique at 84 and PaperArtsy is no exception. As you can see from the photograph above, they produce great products for all craft projects, working in conjunction with some great designers. 

The newly released A5 JOFY rubber stamp set from PaperArtsy, JOFY Collection 30 is so much fun to work with. Designed by Jo Firth-Young it contains nine stamps individually trimmed on EZ mount. I wanted to try out the new postcard tags (available in manila and white) that we are now selling in the Wanstead shop and online. I used the honeycomb stamp with a Versafine 'Vintage Sepia' ink pad, to create the background and then combined that with one of the text stamps which I stamped using Rangers Archival 'Watering Can' and lastly added some of the smaller bees using a Rangers Archival 'Jet Black' ink pad.

I then stamped the larger bee, beehive and both sizes in the honeycomb stamps. Then I coloured them in using  some of the PaperArtsy Fresco Finish Acrylic paints. I used 'Tango' and 'Yellow Submarine' to colour the bodies of all the bees, 'Chocolate Pudding' and 'Brown Shed' for the beehive and a mixture of 'Pumpkin Soup' with some other shades of brown for the honeycomb pieces. I applied all the paint using a water brush, which at the moment is my favourite way of working with the paint to create shading.

I cut out all the images I had stamped, covering the  large honeycomb shapes in Rangers Glossy Accents giving them a shine to contrast against the smaller shapes. Finally I used STIX2 foam pads to create a 3D effect and stuck all of my cut outs to the postcard tag.

I was really pleased with the finished tag, I had been wanting to use Jo's bees for a few weeks, so was finally excited to be able to do a project. It reminds me that Summer is on it's way!

I hope you have enjoyed tonight's project, look out for some exciting posts over the next few days.
Dan


Tuesday, 12 May 2015

It Certainly Is STAMPENDOUS!

                                           Design and photograph World © Lyn Wilkinson - All rights reserved


Last week we posted a project where I had used some of the latest products to come into the shop, a Jumbo Cling Rubber Set and co -ordinating die from STAMPENDOUS! They really are great to work with, so I have used another one for tonight's post. This time it is the 'Hummingbirds' set as shown in the picture above. 

I stamped the flower and leaf image directly onto a light green piece of lightweight card which using Scotch Double Sided tape (this is used by Sue Wilson on most of her craft projects and has recently become a favourite of ours) I stuck it to the white card itself, which is a 300gsm smooth card. 


I then stamped and die cut some additional flowers and a hummingbird. For all the stamping I used a Rangers Archival Wendy Vecchi 'Watering Can' ink pad to create a more subtle look. For colouring the flowers I die cut, I used various Tim Holtz Distress Ink Pads in 'Seedless Preserves',    'Victorian Velvet' and 'Picked Raspberry' working with a Tim Holtz Mini Ink Blending Tool, which is great because it is small and round and easy to work with. 

A technique I like to use is highlighting the centre of the flowers with a small amount of yellow, which I did by using Rangers 'Daffodil' Liquid Pearls. I simply squeezed a small amount in the middle of each flower and dabbed it off immediately with kitchen towel. It leaves traces of the yellow behind, which is very easy to do but very effective. 

To colour the hummingbird I used a variety of 'PaperArtsy Fresco Acrylic Chalk' paints such as 'Hey Pesto' and the newly released 'Blue Glass' applied with a water brush. I also used various PaperArtsy paints in green and pinks to colour the leaves and flowers I stamped onto the green card, again using a water brush which is a great way to blend colours. 


I wanted the additional flowers and hummingbird to stand out more so I used Rangers Inkssentials Glossy Accents which created a beautiful shine. I stuck the flowers and hummingbird to the light green background paper using Stix2 foam pads to create a 3D effect. Finally for some finishing touches, I put a small pink self adhesive pearl in the middle of each flower and used a white pearl in the bird's eye.

The wording is part of a rubber stamp set from PaperArtsy, E Lin Brown 06 which I stamped with Versacraft Ink Pad in Spring Green. This stamp set contains 7 different sentiments individually machine trimmed on EZ mount and retails at £19.99, available from our shop in Wanstead and on our website.

I hope you have enjoyed tonight's post, we will be posting another project on Friday evening at 6pm and it really is 'the bee's knees….', that is a little clue. 

Happy Crafting!

Dan

Sunday, 27 July 2014

GIVE ME SOME BEAR HUGS....


I used a size 8 Manila Tag and coated it using Cosmic Shimmer "White" Gesso Primer.  Next I created the background colour by painting the whole tag in PaperArtsy "Nougat" Acrylic Paint. Once dried I painted over the top using PaperArtsy "Chocolate Pudding", which I then immediately rubbed off with a baby wipe. This creates a washed look resembling wood.

The edge of the tag was distressed using Tim Holtz "Vintage Photo" Mini Distress Ink Pad. I stamped the "Mr Bear" Sam Poole Creative Expressions bear onto white card using a Versafine "Vintage Sepia" ink pad. I also stamped the bear and wording directly onto the tag again using the Versafine "Vintage Sepia" ink pad. I cut out the bear on the white card and stuck him directly over the stamp on the manila tag using double sided foam pads. This gives the bear a 3D look. I shaded the white area of the bear using the new Crafter's Companion 'Spectrum Noir' "Essentials" set of colored pencils.


I cut out a heart from red card stock and covered it in Ranger Inkssentials Glossy Accents to give it a glossy 3D look and placed it on the bear. I finished the tag by threading through some brown satin ribbon.


I think he looks so handsome.

Happy Crafting!
Lyn


Words and Pictures World © Craft Boutique at 84 - All rights reserved.