Showing posts with label Cosmic Shimmer Acrylic Glue. Show all posts

Wednesday, 22 July 2015

What a Lovely Garden….

Photograph World© Geoff Wilkinson - Design World © Lyn Wilkinson All Rights Reserved


We are really big fans of Jumbo Cling Stamp sets and the matching dies from STAMPENDOUS! They are versatile to use in lots of different craft projects.


So using the 'Lovely Garden' stamp and die set we did a joint project and something a bit different for tonight. A craft project in a frame! You can see the finished piece in the photograph above.


The first thing we did was to stamp the large and medium rose, along with some leaves and the butterfly using a Rangers Archival Wendy Vecchi Ink Pad in 'Watering Can' on smooth white stamping card. The grey colour can be a good alternative to a black ink as it is a little softer. 


Next we die cut out the stamped images and coloured them using Tim Holtz Distress Inks in a variety of pinks such as 'Victorian Velvet' and 'Spun Sugar' and greens such as 'Mowed Lawn'. 'Mustard' was used to highlight the leaves and flowers and 'Seedless Preserves' (deep purple) which adds depth again to both the flowers and leaves.  

For the butterfly we used a combination of blues including 'Salty Ocean', adding the orange of 'Spiced Marmalade'. We used a Tim Holtz Mini Ink Blending Tool, which is great because it is small and round and easy to work with.


WOW! Ultra High Clear Gloss Embossing Powder was used in conjunction with a Watermark VersaMark stamp pad to give the die cut images a ceramic look, which creates a beautiful shine.To make the centre of each of the flowers I used Rangers 'Daffodil' Liquid Pearls


Photograph World© Geoff Wilkinson - Design World © Lyn Wilkinson All Rights Reserved
To stick the large flowers and leaves to the white mount board we used Cosmic Shimmer Acrylic Glue. The smaller roses and butterfly were stuck using STIX2 Double Sided Foam Pads to create a 3D look. This was also used on some of the larger roses around the edges to make them look more realistic. Mount board was used for the background because we were going to put it in a frame. In fact mount board is really good for using as a background on craft projects as it is sturdy but not too thick.


The picture frame we used is made out of a plain white wood moulding and was made in our Photography Gallery in Wanstead, 'Eighyfour'.

Photograph World© Geoff Wilkinson

We had fun making this project, especially using the new products from STAMPENDOUS!

We hope you enjoyed tonight's post. Look out for another post on Friday night.

Lyn and Dan
x x x


Sunday, 14 June 2015

The Theme of Tonight….The Beauty of Simple Die Cutting - Project Three

 Photograph World© Geoff Wilkinson - Design World © Lyn Wilkinson All Rights Reserved

Tonight is the last of the three projects in this series and I wonder if you can guess who had more influence in designing this card, based on the colour theme. If you follow the blog regularly you will definitely know! 

For the previous two cards we used dies designed by Sweet Dixie and Wild Rose Studio and we used different embossing folders as a contrast. The project in the photograph above is slightly different as it combines dies from both Wild Rose Studio and Sue Wilson at Creative Expressions. I have heard Sue Wilson say that she designs  her dies to work in conjunction with each other. I think that you can combine dies from different designers on your projects, which not only makes your projects more interesting but also means you get the most out of your dies.

The Butterfly dies used are the same as in the previous project, the "Peacock Butterfly" and "Little Butterfly" from Wild Rose Studio. 

The die at the bottom of the card was cut out in both black and white card using the Border die, from Sue Wilson's, Creative Expressions French Collection - Corner, Border & Tag die set. The set contains three dies. The white die cut was stuck over the black card using Cosmic Shimmer Acrylic glue. I hope that you can see from the photograph the shadow effect that this creates. The same technique was used in the top right hand corner of the card, this time using the Corner die from the set. I think both of these dies work really well with the delicate wings of the butterflies. 

Rangers Liquid Pearls in "Platinum Pearl" was used along the body of the butterfly to add some colour. Finally we stamped a sentiment from a stamp set by IndigoBlu called 'B.F.F', using a Rangers Archival "Jet Black" ink pad.

So that was the last of the projects in this series and as promised below are details of our next card making workshop. I hope you have enjoyed all the cards and reading about how they were made.

Happy Crafting,
Dan
x

Card Making Workshop - Theme: Die Cutting 
Sunday the 28th of June
12.30pm to 2.30pm
Cost £7.50 per person
(includes all the materials you need and of course tea, coffee and cake!)

Limited Spaces Available

To book your place, please call the shop on 0208 530 1244.


Saturday, 13 June 2015

The Theme of Tonight….The Beauty of Simple Die Cutting - Project Two

 Photograph World© Geoff Wilkinson - Design World © Lyn Wilkinson All Rights Reserved

Tonight's project features a variety of Speciality Dies from Wild Rose Studio. To start with we die cut both the "Peacock Butterfly" and "Little Butterfly" in a mix of the white and purple card to create a 3D effect as the main focus on the card. These are two of our favourite dies from Wild Rose Studio and work beautifully individually and together. 

At the bottom we used the "Woodland Border" die, which we cut out in white card and stuck it down with Cosmic Shimmer Acrylic glue. This glue is great to use and is how all the other die cuts were also stuck down. The die that you can see in the photograph that links in between the butterflies and woodland border is a die called "Oval Flower" again in white card, however instead of using the complete die, once it was cut out we cut off part of it to make it look like it was climbing out of the "Woodland Border". 

Rangers Liquid Pearls in "Lavender Lace" was used to bring out the detail of the middle of the flowers and the body of the butterfly. The slightly larger flower just above the sentiment was outlined with the "Lavender Lace"  and we added a Creative Expressions 5mm white pearl in the centre. The sentiment itself is also from a range by Wild Rose Studio, which was stamped with a Versacraft Ink Pad in "Wisteria"

I am hoping that you can see from the photograph that the top layer white card has some texture in it. This was done using and embossing folder called "Linear Leaves", which is new in 2015 from Creative Expressions.

I hope you have enjoyed looking at this project, I think the purple and white work particularly well together as a colour theme.

Back tomorrow for the last project in our series of three and remember we will be posting details on our upcoming card workshop.

Dan
x

Tuesday, 2 June 2015

I Couldn't Leave the Boys Out….

 Photograph World© Geoff Wilkinson - Design World ©  Danielle Wilkinson -  All Rights Reserved

I told you I wouldn't leave the boys out didn't I? So here I am with my second project using the 'Ornate Pram' Speciality Die from Wild Rose Studio. I used our 'Spellbinders Grand Calibur' to cut the die and again I have to say it did the job beautifully.

I used a smooth white 300gsm card for the base and also for the top layer with the pram die cutout. As I chose a pink and white colour theme for the baby girl card I posted on the blog on Friday, I decided to go for a blue and white colour theme for the baby boy card. As you can see from the photograph I used a blue and white striped card under the top layer and stamped the sentiment on white card also on top of a strip of the same blue and white card. I used 'Scotch Double Sided Tape' to stick all the layers. 

I die cut the 'Ornate Pram' in blue pearlised card along with another new Wild Rose Studio die for 2015 called 'Vivianna Corner', which as you can see I used on one of the top corners. To stick down the pram die cutout I used 'Cosmic Shimmer Acrylic Glue'. To stick down the 'Vivianna Corner' 
I used STIX2 foam pads, adding a 3D look to the project. 

The sentiment itself is made up of two stamps from Wild Rose Studio's 'Vivianna Greetings' clear stamp set, stamped with a Versa Craft 'Midnight' ink pad. I often like to create different layers in my projects to make them more interesting, so again I made this 3D by using the foam pads.

For the final touches this time I used some Creative Expressions 5mm white self adhesive pearls in the corner. In the centre of the wheels on the pram and the top of the 'Vivianna Corner' I added blue diamantes. Sparkly, I love it!

This card took a little longer to make than the baby girl card because as you can see it is bigger and there is more on it, even though the prams are in the same place on both. I just wanted to demonstrate that you can use the same die to create different looks.

Look out for a new project post on Friday night.

Happy Crafting!
Dan

You can find us at:
 'eightyfour' 
84 Nightingale Lane, 
Wanstead, 
London E112EZ 
Tel: 0208 530 1244  
www.craftboutique84.com


Friday, 29 May 2015

Here Comes the Girl….

 Photograph World© Geoff Wilkinson - Design World © Lyn Wilkinson All Rights Reserved

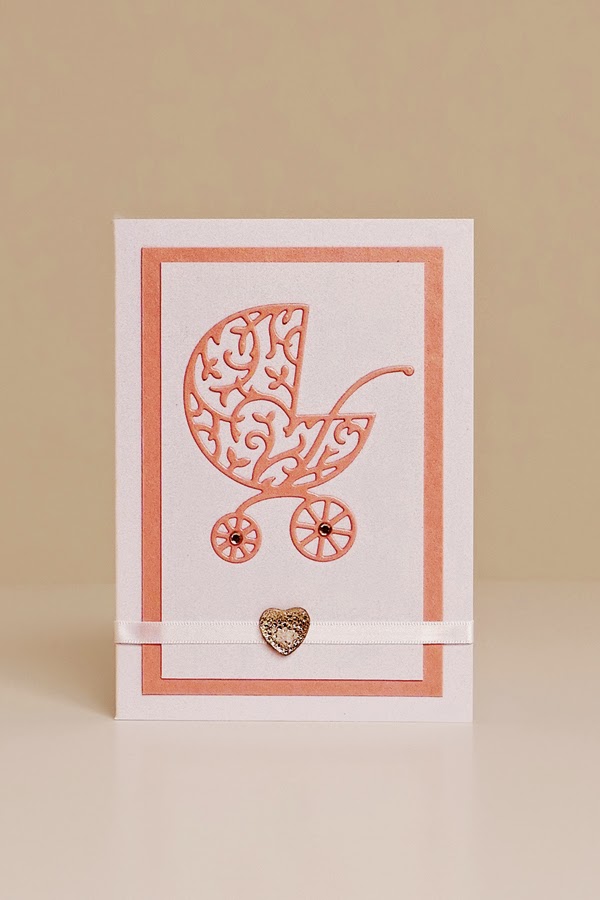
I am back as promised with another project using a Wild Rose Studio Speciality Die, this time it is the 'Ornate Pram' which is a newly released die in 2015. I used our 'Spellbinders Grand Calibur' to cut the die and I have to say it did the job beautifully.

As I chose to make a card for a new baby girl I decide the colour pink was a must, so as you can see used pink card to cut out the die and as a background layer. The pink card was pearlised, so I made the card itself and the embellished in 'Crafters Companion Fresh White Centura Pearl' card. I used 'Scotch Double Sided Tape' to stick all the layers of card and 'Cosmic Shimmer Acrylic Glue' to stick down the pram die. 

For the final touches I used some thin white satin ribbon and a 'Heart Sparkler' embellishment from Creative Expressions Finishing Touches range. I also couldn't resist adding a pale pink diamond to centre of each of the wheels on the pram as I love a bit of sparkle!

The card did not take long to make and I have to say I was really pleased with it. I couldn't leave the boys out could I? So look out for the post on Tuesday.

Also as a reminder we have our Free Demo Day at the shop in Wanstead starting at 12pm this Sunday the 31st. So if you are looking for some crafty inspiration pop in and see us. You can find us at 'eightyfour' 84 Nightingale Lane, Wanstead, London E112EZ tel: 0208 530 1244  www.craftboutique84.com

See you soon,
Dan


Tuesday, 5 May 2015

A Tropical Combination

                                 Design and photograph Word © Lyn Wilkinson - All rights reserved


We are huge fans of PaperArtsy at Craft Boutique at 84, stocking their full range of Fresco Finish Acrylic Chalk paints, a large selection of rubber stamps and other PaperArtsy 'crafty stuff'. When there are new products available we love to order them in and of course try them out!  Pictured above is the most recent Limited Edition set of paints by Lin Brown. Fun, bright and versatile, from what I understand inspired by a trip Lin took, there are four colours in the set and they are called 'Banana', 'Tangerine Twist', 'Caribbean Sea' and 'Bougainvillea'. The set retails at £15.60 and is available to buy from our website or shop in Wanstead and being Limited Edition, they are only available while stocks last.

Also in the picture is a fabulous set of new stamps from Jo Firth-Young, comprising of five stamps individually trimmed and mounted on EZ mount. The set called JOFY Collection 32 has a butterfly, two different types of flowers, a honeycomb shape and 'thanks' wording and is priced at £19.99 from Craft Boutique at 84.

We really wanted to combine Jo's flowers in the stamp set with Lin's paints to give a tropical feel. As the paints are so versatile, using a water brush with them on the cut out flowers you can see that they create a very different effect to when they are not watered down, as you can see from the bright pinks and blues on the base of the Manila Tag. The cut out flowers have been finished off by using Rangers Liquid Pearls in the centre of them and then glueing them to the Manila Tag with Cosmic Shimmer Acrylic Glue.

This was one of our favourite projects which we did last week because the products are great to work with, we hope you like it too.

Look out for more ideas and another 'crafty' project on Friday night.

Lyn and Danielle


Saturday, 12 July 2014

My Best Friend Forever - by Lyn Wilkinson


I was asked to produce something for a friend's birthday with an animal theme, so chose the delightful 'Squeak' and 'Hoppity Bunny' rubber stamps designed by Sam Poole, Creative Expressions as my subject.


I cut a piece of acid free 23cm square white mount board and painted the edges using PaperArtsy Fresco Finish Chalk Acrylic Paints 'Vanilla' and 'Snowflake' mixed together. I  then used Tim Holtz Mini Distress Ink Pad, 'Vintage Photo' to create a distress look by rubbing it directly over the paint. You can see this effect in the finished project.


I cut a piece of Prima Cartographer Collection "Boussole" 12x12 inch paper, into a 22cm square, tore the edges and distressed with Tim Holtz Mini Distress Ink Pad, 'Vintage Photo'.


I then stamped directly onto the paper using Sam Poole's rubber stamps, 'Tree Background' with 'Squeak' and 'Hoppity Bunny' in the foreground. I then used IndigoBlu's 'You are my B.F.F' rubber stamp from their "B.F.F" stamp set in the top right hand corner. All were stamped using a Versafine 'Vintage Sepia' ink pad.


I stamped 'Squeak' and 'Hoppity Bunny' using the Versafine 'Vintage Sepia' ink pad onto cream card, embossed them using WOW clear embossing powder and cut out one of each.


I coloured them using PaperArtsy Fresco Finish Paint 'Chocolate Pudding' watered down leaving some areas exposed with the cream card to create a contrast.


Using my Sizzix Big Shot, I cut out this Wild Rose Studio Speciality Craft Die, 'Peacock Butterfly', which I then painted using PaperArtsy Fresco Finish Paint 'Chocolate Pudding', watered down. I used Ranger Liquid Pearls in 'Bisque' to apply pearls to the body of the butterfly and to paint the outside of the wings to highlight them.


Using Cosmic Shimmer Acrylic Glue I stuck all the cut outs onto the paper to give a 3D look. 'Squeak' and 'Hoppity Bunny' were placed over the stamped images on the paper (just a tip, this is an easy way to retain the whiskers if you cut them off when cutting them out of the card). I also used the wording stamp from 'Hoppity Bunny', "Hoppin' by to say hi" again using the Versafine 'Vintage Sepia' ink pad and placed it between both animals.


To finish off the project I placed it in a frame. I was really pleased with the outcome and my friend was delighted with the end result.

All the products I used can be purchased from our shop in Wanstead or our online shop Craft Boutique at 84.

Happy Crafting!
Lyn


Words and Pictures World © Craft Boutique at 84 - All rights reserved.


Sunday, 6 July 2014

Welcome to our 1st post


Step by Step Sentiment Tag


Image 1

Size 8 Manila tag bac
kground distressed using Tim Holtz ‘Picket Fence’ Distress Paint
Image 2

The second layer is Tim Holtz ‘Vintage Photo’ Distress Stain.
Image 3

Tag edged with Tim Holtz Mini Distress Ink Pad ‘Walnut Stain’ using a Ranger Mini Ink Blending Tool
Image 4

Red hearts applied using Tim Holtz Hearts Stencil and Mini ‘Fired Brick’ Distress Ink Pad
Image 5


Red Hearts in top right hand corner embossed with WOW Embossing Powder ‘Primary Apple Red’
Image 6
Embellishments - ‘Forever starts today’ cut from Prima ‘Something Blue Collection’ papers. The edging was distressed using Tim Holtz Mini ‘Walnut Stain’ Distress Ink Pad
  • ‘Hotel Palace’ from Tim Holtz idea-ology Ephemera Pack
  • ‘I do’ wood embellishment from Prima ‘Something Blue Collection’. This was distressed using Tim Holtz Mini ‘Walnut Stain’ Distress Ink Pad
  • All applied to the Tag using ‘Cosmic Shimmer’ Acrylic Glue
  • ‘Love’ plate from Prima ‘Junkyard Findings’ Jeans Plates. Wording enhanced with Tim Holtz ‘Picket Fence’ Distress Paint and stuck to Manila Tag using ‘Cosmic Shimmer’ Acrylic Glue

Completed tag with painted white string again using Tim Holtz ‘Picket Fence’ Distress Paint.
Image 7

Words and Pictures World © Craft Boutique at 84 - All rights reserved.