Showing posts with label Crafters Companion. Show all posts

Sunday, 12 June 2016

'Card Making Craziness!!'...Look What We Made....

This month's craft workshop theme was 'Card Making Craziness'. We held the same workshop over two nights on Wednesday the 1st and Thursday the 2nd of June. We had a great turn out again this month and everybody said that they had a really wonderful time. Thank you to everybody that attended. 

The variations in everybody's cards looked fantastic and were going to be used for a mixture of occasions including Father's Day, an engagement and birthdays to name a few.

We used the new 'By The Sea' Clear Stamp Set from Creative Expressions to create a nautical themed card. The matching 'Lovely Garden' stamp and die set from Stampendous! was used to make the negative space themed card featuring the butterfly. The negative space background was coloured in using Crafter's Companion Spectrum Noir Alcohol Ink markers and they were also used to colour in the boat on the nautical card. Also used on the night were a variety of WOW! embossing powders (they are fab!!).

Below are photographs of what was made on the night, we hope you enjoy looking through them.

Lyn and Dan
x x


Photograph World© Geoff Wilkinson


Wednesday, 24 February 2016

'I LOVE CRAFT' Demo Day....


Photograph World© Geoff Wilkinson 

Thank you to everybody that attended our 'I Love Craft' Demo Day on the 14th of February. We had a great time demonstrating some hot foil techniques as well as some heat embossing techniques, the PaperArtsy paint brayer technique and stamping and colouring on wood using Crafter's Companion Spectrum Noir pencils and pens, as you can see in the pictures. As it was Valentine's Day, there was lots of chocolate to eat as well!

Lyn and Dan
x

Photograph World© Geoff Wilkinson
Photograph World© Geoff Wilkinson 

Tuesday, 23 February 2016

First Craft Workshop of 2016.... Making Your Mark!


Photograph World© Geoff Wilkinson 


Our first workshop of the year was held at the shop on Wednesday the 27th of January. It was an evening workshop and everybody said they had a great time. It was an evening dedicated to making Crafty Bookmarks and the end results from everybody were beautiful as you can see in the picture above and those below. We wanted to say a big thank you to everybody that came on the night, we had a great time too.

Lyn and Dan


x

So what products did we use? Well the rubber stamps were all from PaperArtsy designed by Jo Firth-Young and Lin Brown to name a few designers and also from Indigoblu. The backgrounds were created using Tim Holtz Distress Inks and the stamped images were coloured in using a combination of PaperArtsy paints and Crafter's Companion Spectrum Noir Pens


Photograph World© Geoff Wilkinson 

Photograph World© Geoff Wilkinson 

Friday, 1 January 2016

New Year....New Craft Products....Look at the New Spectrum Noir ColourBlend Pencils by Crafter's Companion


Photograph World© Geoff Wilkinson

Crafters Companion have just brought out Spectrum Noir ColourBlend pencils available in five different sets; Primaries, Essentials, Shade and Tone, Naturals and Florals.

Each set contains a variety of 24 coloured pencils, which are perfect for colouring, sketching and illustration. Rich vibrant pigment for smooth, highly saturated colour laydown.

They are great for all your crafting projects including card making, scrapbooking and mixed media projects.

We have them in stock at Craft Boutique 84. Please remember we will not be open until Wednesday the 20th of January but you can reserve any products by calling the shop on 020 8530 1244 as we will be picking up messages.

Look out for our upcoming workshops and demo days where you will also see them in action!

Lyn and Dan
x x

Saturday, 25 July 2015

It's a White Wedding….


Photograph World© Geoff Wilkinson - Design World © Lyn Wilkinson All Rights Reserved

Happy Saturday! I hope there is lots of crafting going on this weekend.

We were recently asked to make a wedding card for somebody for a wedding they are attending this month. We really enjoy doing projects like this, because we think it is a compliment when somebody asks us to make something crafty for them. 

We thought it would make a great post on the blog, so you can see what we have been up to. It is another joint project from us and on this occasion we did not have a design in our minds before we started. All we knew was that we wanted it to be in either cream or white pearlised card and wanted to incorporate an embossing folder to add texture.

As you can see from the photograph above we went with a very simple colour theme. I think it is always very interesting when you limit the colour combination on a craft project and in this instance the  main colour is white with a hint of silver.

The card itself is made from Crafter's Companion Centura Pearl 300gsm card and the colour is 'Snow White Hint of Gold'. Using the same card and Creative Expressions Heart Lattice embossing folder we created the top layer. Once the card was embossed we then die cut out Sweet Dixie's Floral Heart Frame which created a heart shape in the card, again in the same Centura Pearl card. Behind the heart cut out we put a piece of silver swirl texture paper to create contrast. We then stuck down the embossed card layer with Scotch Double Sided tape and using STIX2 double sided foam pads stuck the heart die cut out over the top of the shape in the card to create a 3D effect.


Using the Wild Rose Studio Dies, 'Little Butterfly' and 'Peacock Butterfly', we die cut one of each in the Centura Pearl card and one of each in the silver swirl texture paper. Using glue dots along the bodies we stuck the silver paper butterflies over the Centura Pearl butterflies. The self adhesive pearls on the floral heart are white 8mm and the ones on the body of the butterflies (which hopefully you can see) are 3mm, both from Creative Expressions.

The sentiment proved the most difficult as we really could not decide what to do. We went quite subtle in the end and I think it works really well. We cut out a small circle die, stamped a Wild Rose Studio sentiment using a VersaMark Watermark stamp pad and heat embossed it using WOW!'s Metallic Silver embossing powder. We used the STIX2 Foam pads to stick it to the card, again creating a 3D effect.


Photograph World© Geoff Wilkinson - Design World © Lyn Wilkinson All Rights Reserved

Finally to add some finishing touches to make the card a little more special, we used a butterfly stamp from the 'Lovely Garden' stamp set by STAMPENDOUS! to stamp a butterfly on the inside of the card and the envelope in metallic silver. 

I hope you have enjoyed today's post.

Dan


Thursday, 16 July 2015

I'll Bee Back….

 Photograph World© Geoff Wilkinson - Design World © Lyn Wilkinson All Rights Reserved


Well I did say I would be back with the Triple Decker, Double Stamping technique and here I am. I absolutely love the bees at the moment, they are so 'Summery'!

The card in the photograph above is made out of black card stock and as you can see there are three layers of a white card on top which is smooth white 300gsmThe black card has also been used to create the borders for each of the white layers and I think it frames them really well. All the layers were stuck down using a Crafters Companion Extra Strong Permanent Glue Tape, which is an easy to use double sided adhesive.

I used a PaperArtsy Stamp Set, JOFY Collection 30 from Jo Firth-Young. I used the honeycomb effect stamp first as the background which I used with a Rangers Archival Ink Pad in 'Potting Soil'. I stamped first on paper then on the white card. This made the background lighter to really bring out the bee stamp image, I used a Rangers Archival Ink Pad in 'Jet Black' to stamp the bees. The 'bee happy' sentiment is also stamped in the black and I did this last so not to smudge anything else.

To get the stamped effect on this card, you temporarily stick all the white layers of card together and then do the stamping. Once done you then put the black layers of card inbetween. You need to make sure that you line the card up so that the image looks continuous.

I coloured the bees with two PaperArtsy Fresco Finish paints, 'Yellow Submarine' and 'Tango' using a water brush which allows you to blend the paints beautifully together. I think the bright colours against the stamped background and bees works really well, as it creates a real contrast.

I hope you have enjoyed tonight's project. We have had some nice feedback from people who have seen it in the shop.

Happy Crafting!
Dan
x

P.S, Look out over the weekend for posts on new products we have in the shop and yes some of them are Christmas related! 

I also wanted to let you know that September is going to be Crafting Month at the shop in Wanstead. Look out for details on free demos, make and takes, workshops and lots more where you will have the opportunity to learn new techniques and see new products. We will also be showing you some techniques that customers have asked to see and have a go at again. 


Tuesday, 23 June 2015

TRIPLE DECKER….DOUBLE STAMPING….


 Photograph World© Geoff Wilkinson - Design World © Lyn Wilkinson All Rights Reserved

You know sometimes when you are working on a craft project and you get really excited inside because you have a feeling it is going to look really nice when it is finished? Well that is exactly how we felt when we started doing this card. This is a technique that we have seen before but never used, so really wanted to give it a go and are really happy with the results.

The card itself is made out of black card stock and as you can see in the photograph above there are three layers of a light cream card on top which is a Foundation Card from Creative Expressions, 220gsm and the colour is called 'Milk'. It is a real favourite colour of ours. As you can see the black card has also been used to create the borders for each of the cream layers and I think it frames them really well. All the layers were stuck down using a Crafters Companion Extra Strong Permanent Glue Tape, which is an easy to use double sided adhesive.

Two different stamps were used to create the images on the front of the card, The first one was a leaf style clear stamp from Woodware and was stamped using a Rangers Archival Ink Pad in "Watering Can", which created the soft background. Next using a Rangers Archival Ink Pad in "Jet Black", we stamped the flower stamp and this is what created the bolder look against the soft background. I think that the grey and black ink combined works well against the black and cream card, however you could use other ink pad combinations to create similar effects. 

To get the stamped effect on this card, you temporarily stick all the cream layers of card together and then do the stamping. Once done you then put the black layers of card inbetween. You need to make sure that you line the card up so that the image looks continuous.

To finish off the outside of the card, we used a Rangers Liquid Pearl in "Majestic Purple", which although quite subtle against the bold stamped image of the flowers, the colour compliments the grey and black colouring.


 Photograph World© Geoff Wilkinson - Design World © Lyn Wilkinson All Rights Reserved

To make this project a bit more special by linking the inside of the card to the outside of the card,  as you can see from the photograph we also stamped the flower in "Jet Black" and added the "thanks" sentiment from PaperArtsy.  Just a little tip, but when using a colour card as the base for your project, you can use a more neutral coloured card on the inside to write your message. I think that the "milk" card works really well in this instance.

I hope you enjoyed seeing this project. The triple decker and double stamp technique is a lovely way to work and I have a feeling over the next few weeks you may see some more projects with a similar look.

Happy Crafting!
Dan

P.S - Just a reminder that we have a card making workshop at the shop in Wanstead this weekend on Sunday, so if you would like to join us please call the shop on 0208 530 1244 to book your place.


Friday, 29 May 2015

Here Comes the Girl….

 Photograph World© Geoff Wilkinson - Design World © Lyn Wilkinson All Rights Reserved

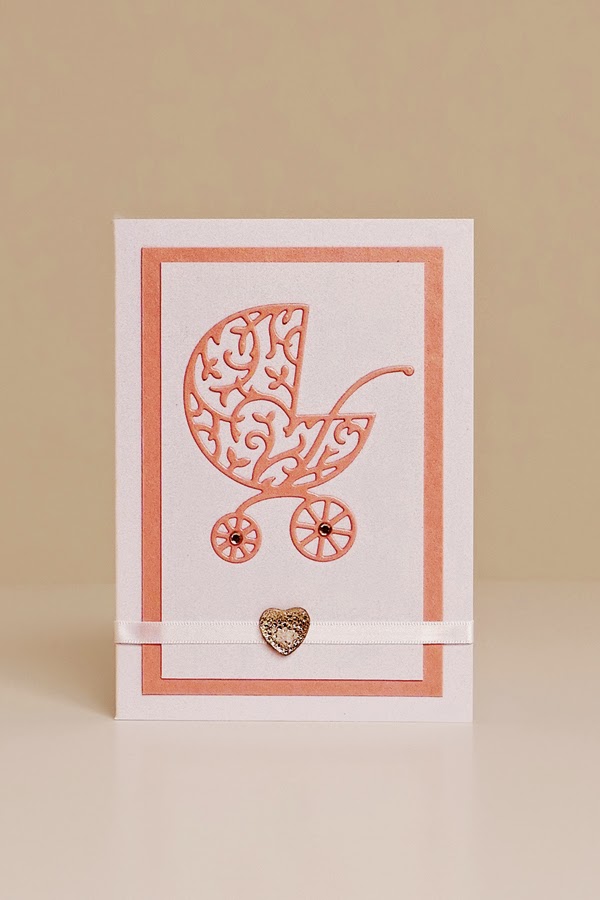
I am back as promised with another project using a Wild Rose Studio Speciality Die, this time it is the 'Ornate Pram' which is a newly released die in 2015. I used our 'Spellbinders Grand Calibur' to cut the die and I have to say it did the job beautifully.

As I chose to make a card for a new baby girl I decide the colour pink was a must, so as you can see used pink card to cut out the die and as a background layer. The pink card was pearlised, so I made the card itself and the embellished in 'Crafters Companion Fresh White Centura Pearl' card. I used 'Scotch Double Sided Tape' to stick all the layers of card and 'Cosmic Shimmer Acrylic Glue' to stick down the pram die. 

For the final touches I used some thin white satin ribbon and a 'Heart Sparkler' embellishment from Creative Expressions Finishing Touches range. I also couldn't resist adding a pale pink diamond to centre of each of the wheels on the pram as I love a bit of sparkle!

The card did not take long to make and I have to say I was really pleased with it. I couldn't leave the boys out could I? So look out for the post on Tuesday.

Also as a reminder we have our Free Demo Day at the shop in Wanstead starting at 12pm this Sunday the 31st. So if you are looking for some crafty inspiration pop in and see us. You can find us at 'eightyfour' 84 Nightingale Lane, Wanstead, London E112EZ tel: 0208 530 1244  www.craftboutique84.com

See you soon,
Dan