Showing posts with label Craft Boutique 84. Show all posts

Sunday, 21 August 2016

New Products Now In Stock.....


We have some new brand new products in stock at the shop in Wanstead including stamps, masks and dies from Creative Expressions, stamps from Woodware and a fabulous Gingerbread clear stamp and die set from STAMPENDOUS! 
Below are photographs of some of the products. 
We hope you enjoy looking. 

Lyn and Dan x x 

Photograph World© Geoff Wilkinson

Thursday, 11 August 2016

Craft Workshops....'In The Bag'....Wednesday 28th and Thursday 29th September 2016

Craft Workshops - 'In The Bag'

Wednesday 28th September 2016


and

Thursday 29th September 2016

7.30pm to 9.30pm at the shop in Wanstead.


We are running the same workshop on two different evenings due to popular demand.


Enjoy a couple of hours and get crafting using a variety of techniques to design and decorate your own canvas tote bag.

This is a great workshop to attend as you will not only learn to use various craft products but also some new crafting skills.


Cost: £12.50 per person, includes all the materials you need plus tea, coffee and cake.


To book your place you can send an email or call the shop on 020 8530 1244 and leave a message. We are picking up messages while on holiday and are back in the shop next week.

Places are limited.

We look forward to seeing you,
Lyn and Dan

Friday, 24 June 2016

Cosmic Shimmer Metallic Gilding Polishes Are Back In Stock!!


Cosmic Shimmer Metallic Gilding Polishes are now back in stock at Craft Boutique 84. We have all 12 colours available at £4.99 each.

You can choose from Pearl Lustre, Citrus Green, Silver Dream, Rich Red, Red Bronze, Chocolate, Gold Treasure, Copper Shine, Ocean Teal, Purple Mist, Mediterranean Blue and Indian Pink.

You can see some of the colours in the photographs below.

Photograph World© Geoff Wilkinson

Sunday, 12 June 2016

'Card Making Craziness!!'...Look What We Made....

This month's craft workshop theme was 'Card Making Craziness'. We held the same workshop over two nights on Wednesday the 1st and Thursday the 2nd of June. We had a great turn out again this month and everybody said that they had a really wonderful time. Thank you to everybody that attended. 

The variations in everybody's cards looked fantastic and were going to be used for a mixture of occasions including Father's Day, an engagement and birthdays to name a few.

We used the new 'By The Sea' Clear Stamp Set from Creative Expressions to create a nautical themed card. The matching 'Lovely Garden' stamp and die set from Stampendous! was used to make the negative space themed card featuring the butterfly. The negative space background was coloured in using Crafter's Companion Spectrum Noir Alcohol Ink markers and they were also used to colour in the boat on the nautical card. Also used on the night were a variety of WOW! embossing powders (they are fab!!).

Below are photographs of what was made on the night, we hope you enjoy looking through them.

Lyn and Dan
x x


Photograph World© Geoff Wilkinson


Wednesday, 11 May 2016

FREE CRAFT DEMO DAY...SAVE THE DATE... Sunday 26th June 2016

Craft Demo Sunday - SAVE THE DATE IN THE DIARY!

Sunday 26th June 2016

Free Craft Demo Day, 12pm to 3pm at the shop in Wanstead.

Details of what we will be doing will follow but this is not a demo to be missed!

Refreshments will be served.


We look forward to seeing you.

84 Nightingale Lane, Wanstead, London E11 2EZ    
Telephone: 020 8530 1244

Monday, 9 May 2016

June Craft Workshops....'Card Making Craziness!!'....Wednesday 1st and Thursday 2nd June 2016

Craft Workshops - 'Card Making Craziness!!'

Wednesday 1st June 2016

and

Thursday 2nd June 2016

7.30pm to 9.30pm at the shop in Wanstead.


We are running the same workshop on two different evenings this month due to popular demand.

Enjoy a couple of hours and get crafting using a variety of techniques to make some fabulous cards!! (We had requests at the demo day on Sunday for a card making workshop as we have not had one for a while).

This is a great workshop to attend as you will not only learn to use various craft products but also some new crafting skills.


Cost: £10.00 per person, includes all the materials you need plus tea, coffee and cake.


To book your place you can send an email or call the shop on 020 8530 1244. 

Places are limited.

We look forward to seeing you,
Lyn and Dan

Monday, 2 May 2016

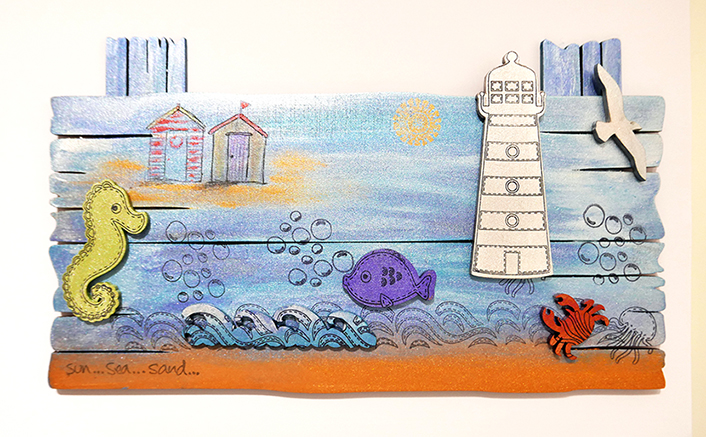
'Nautical But Nice' Workshop...Look What We Made....

This month's craft workshop theme was 'Nautical But Nice' and it was very nautical. We held the same workshop over two nights on Wednesday and Thursday of last week. We had a huge turn out again this month which was great and everybody said that they had a really wonderful time. Thank you to everybody that attended, the variations in everybody's piece of work looked fantastic. 
We used the brand new Cosmic Shimmer Gilding Polishes (they are fab!), they are easy to use and blend together beautifully. We also used the By The Sea MDF Driftwood, MDF Accessory Pack (this contains the boats, fish, lighthouse etc.) and Clear Stamp Set all by Creative Expressions. 
Below are pictures of what was made on the night. There are lots of photographs we hope you enjoy looking through them.

Lyn and Dan
x x


The piece in the photograph above was done using PaperArtsy chalk paints. They also blended beautifully.


Thursday, 3 March 2016

Free Craft Demo Day... 'SPRING INTO LEARNING NEW TECHNIQUES & PRODUCTS'... Sunday 20th March 2016

Craft Demo Sunday - ' SPRING INTO LEARNING NEW TECHNIQUES & PRODUCTS'

Sunday 20th March 2016

Free Craft Demo Day, 12pm to 3pm at the shop in Wanstead.

We will be showing you a variety of techniques which you can do on all your craft projects, including Mica Powders, Embossing Powders, Colouring Techniques and some surprises.... 


You will get a chance to see new craft products launched in 2016 that we are now stocking in the shop, including stamps, and stencils from Creative Expressions and Cosmic shimmer, stamps from Honey Doo Crafts and lots of fab new products from WOW! plus lots more.... 

This is not a demo to be missed!

Refreshments will be served.


We look forward to seeing you.

84 Nightingale Lane, Wanstead, London E11 2EZ    
Telephone: 020 8530 1244

Wednesday, 4 November 2015

Hello, We are back! Look what our first post is...Christmas Decoration Making Workshop...


Christmas Decoration Making Workshop 
Sunday 15th November  
12pm to 2.30pm

Hi everyone,

Hope you are all well, sorry it has been so long since we posted anything but we are back with lots of exciting posts, workshops and demos at the shop in Wanstead. 
Christmas is rapidly creeping up so we thought is would be a good idea to get into the craft festive season.

Spend a few hours on a Sunday afternoon with a cup of tea and a piece of cake enjoying crafting at Craft Boutique at 84.

We will be using a few different techniques to produce beautiful Christmas Decorations, that can also be used for your Christmas wrapping or as presents for people. 

Cost: £12.50 per person

Refreshments and all your materials included.

Limited spaces available so to book your place please e.mail us or call the Gallery on 0208 530 1244.

We look forward to seeing you.

Lyn and Danielle 


Tuesday, 28 July 2015

Brand New from Sheena Douglass….


New! Just Released Perfect Partner Festive Fancies from Sheena Douglass.

Another range of great Dies and Stamp Sets from Sheena, perfect for all your Christmas Craft Projects. Comprising of Baubles, Christmas Lights, Santa's Little Elf Helper, Fairies, Holly and much much more.

The sets also contain images and sentiments that can be used all year round in conjunction with her other Perfect Partners, which is why they are the ‘Perfect Partner’ for your crafting.

We have ordered them and they will be in the shop next week!

We will be stocking the full range.

Special offer: If you buy a matching Die and Stamp Set from the new Perfect Partner Festive Fancies range you will receive a 10% discount.


If you would like to pre-order, we can reserve them in the shop for you. Just give us a call on 0208 530 1244.

Special offer is only available from our shop in Wanstead and while stocks last.

Saturday, 25 July 2015

It's a White Wedding….


Photograph World© Geoff Wilkinson - Design World © Lyn Wilkinson All Rights Reserved

Happy Saturday! I hope there is lots of crafting going on this weekend.

We were recently asked to make a wedding card for somebody for a wedding they are attending this month. We really enjoy doing projects like this, because we think it is a compliment when somebody asks us to make something crafty for them. 

We thought it would make a great post on the blog, so you can see what we have been up to. It is another joint project from us and on this occasion we did not have a design in our minds before we started. All we knew was that we wanted it to be in either cream or white pearlised card and wanted to incorporate an embossing folder to add texture.

As you can see from the photograph above we went with a very simple colour theme. I think it is always very interesting when you limit the colour combination on a craft project and in this instance the  main colour is white with a hint of silver.

The card itself is made from Crafter's Companion Centura Pearl 300gsm card and the colour is 'Snow White Hint of Gold'. Using the same card and Creative Expressions Heart Lattice embossing folder we created the top layer. Once the card was embossed we then die cut out Sweet Dixie's Floral Heart Frame which created a heart shape in the card, again in the same Centura Pearl card. Behind the heart cut out we put a piece of silver swirl texture paper to create contrast. We then stuck down the embossed card layer with Scotch Double Sided tape and using STIX2 double sided foam pads stuck the heart die cut out over the top of the shape in the card to create a 3D effect.


Using the Wild Rose Studio Dies, 'Little Butterfly' and 'Peacock Butterfly', we die cut one of each in the Centura Pearl card and one of each in the silver swirl texture paper. Using glue dots along the bodies we stuck the silver paper butterflies over the Centura Pearl butterflies. The self adhesive pearls on the floral heart are white 8mm and the ones on the body of the butterflies (which hopefully you can see) are 3mm, both from Creative Expressions.

The sentiment proved the most difficult as we really could not decide what to do. We went quite subtle in the end and I think it works really well. We cut out a small circle die, stamped a Wild Rose Studio sentiment using a VersaMark Watermark stamp pad and heat embossed it using WOW!'s Metallic Silver embossing powder. We used the STIX2 Foam pads to stick it to the card, again creating a 3D effect.


Photograph World© Geoff Wilkinson - Design World © Lyn Wilkinson All Rights Reserved

Finally to add some finishing touches to make the card a little more special, we used a butterfly stamp from the 'Lovely Garden' stamp set by STAMPENDOUS! to stamp a butterfly on the inside of the card and the envelope in metallic silver. 

I hope you have enjoyed today's post.

Dan


Wednesday, 22 July 2015

What a Lovely Garden….

Photograph World© Geoff Wilkinson - Design World © Lyn Wilkinson All Rights Reserved


We are really big fans of Jumbo Cling Stamp sets and the matching dies from STAMPENDOUS! They are versatile to use in lots of different craft projects.


So using the 'Lovely Garden' stamp and die set we did a joint project and something a bit different for tonight. A craft project in a frame! You can see the finished piece in the photograph above.


The first thing we did was to stamp the large and medium rose, along with some leaves and the butterfly using a Rangers Archival Wendy Vecchi Ink Pad in 'Watering Can' on smooth white stamping card. The grey colour can be a good alternative to a black ink as it is a little softer. 


Next we die cut out the stamped images and coloured them using Tim Holtz Distress Inks in a variety of pinks such as 'Victorian Velvet' and 'Spun Sugar' and greens such as 'Mowed Lawn'. 'Mustard' was used to highlight the leaves and flowers and 'Seedless Preserves' (deep purple) which adds depth again to both the flowers and leaves.  

For the butterfly we used a combination of blues including 'Salty Ocean', adding the orange of 'Spiced Marmalade'. We used a Tim Holtz Mini Ink Blending Tool, which is great because it is small and round and easy to work with.


WOW! Ultra High Clear Gloss Embossing Powder was used in conjunction with a Watermark VersaMark stamp pad to give the die cut images a ceramic look, which creates a beautiful shine.To make the centre of each of the flowers I used Rangers 'Daffodil' Liquid Pearls


Photograph World© Geoff Wilkinson - Design World © Lyn Wilkinson All Rights Reserved
To stick the large flowers and leaves to the white mount board we used Cosmic Shimmer Acrylic Glue. The smaller roses and butterfly were stuck using STIX2 Double Sided Foam Pads to create a 3D look. This was also used on some of the larger roses around the edges to make them look more realistic. Mount board was used for the background because we were going to put it in a frame. In fact mount board is really good for using as a background on craft projects as it is sturdy but not too thick.


The picture frame we used is made out of a plain white wood moulding and was made in our Photography Gallery in Wanstead, 'Eighyfour'.

Photograph World© Geoff Wilkinson

We had fun making this project, especially using the new products from STAMPENDOUS!

We hope you enjoyed tonight's post. Look out for another post on Friday night.

Lyn and Dan
x x x


Monday, 20 July 2015

New in Stock!….PLAID Fabric Art….Fabric Creations Inks

Photograph World© Geoff Wilkinson

Just arrived at the shop in Wanstead! Fabric Creations Inks.

These super soft fabric inks are the perfect formulation for stamping, stencilling and brushing on fabric.

The inks are machine washable and are available in a large range of colours.

If you have never done any sort of craft on fabric before, don't forget September is Crafting Month at the shop in Wanstead and there will be the opportunity to have a go. We will be posting details soon.

With crafting on fabric you can create some beautiful projects, not only for yourself but ideal as gifts!

Happy Crafting,
Dan
x


Thursday, 16 July 2015

I'll Bee Back….

 Photograph World© Geoff Wilkinson - Design World © Lyn Wilkinson All Rights Reserved


Well I did say I would be back with the Triple Decker, Double Stamping technique and here I am. I absolutely love the bees at the moment, they are so 'Summery'!

The card in the photograph above is made out of black card stock and as you can see there are three layers of a white card on top which is smooth white 300gsmThe black card has also been used to create the borders for each of the white layers and I think it frames them really well. All the layers were stuck down using a Crafters Companion Extra Strong Permanent Glue Tape, which is an easy to use double sided adhesive.

I used a PaperArtsy Stamp Set, JOFY Collection 30 from Jo Firth-Young. I used the honeycomb effect stamp first as the background which I used with a Rangers Archival Ink Pad in 'Potting Soil'. I stamped first on paper then on the white card. This made the background lighter to really bring out the bee stamp image, I used a Rangers Archival Ink Pad in 'Jet Black' to stamp the bees. The 'bee happy' sentiment is also stamped in the black and I did this last so not to smudge anything else.

To get the stamped effect on this card, you temporarily stick all the white layers of card together and then do the stamping. Once done you then put the black layers of card inbetween. You need to make sure that you line the card up so that the image looks continuous.

I coloured the bees with two PaperArtsy Fresco Finish paints, 'Yellow Submarine' and 'Tango' using a water brush which allows you to blend the paints beautifully together. I think the bright colours against the stamped background and bees works really well, as it creates a real contrast.

I hope you have enjoyed tonight's project. We have had some nice feedback from people who have seen it in the shop.

Happy Crafting!
Dan
x

P.S, Look out over the weekend for posts on new products we have in the shop and yes some of them are Christmas related! 

I also wanted to let you know that September is going to be Crafting Month at the shop in Wanstead. Look out for details on free demos, make and takes, workshops and lots more where you will have the opportunity to learn new techniques and see new products. We will also be showing you some techniques that customers have asked to see and have a go at again. 


Friday, 10 July 2015

You're the bees knees!


Photograph World© Geoff Wilkinson - Design World © Lyn Wilkinson All Rights Reserved

Take one PaperArtsy Stamp Set, JOFY Collection 30 from Jo Firth-Young and a WOW! Embossing Powder in Metallic Gold Rich and look what you get. A card which I think is simple in design but really quite beautiful. I used two rubber stamps from the collection, the large bee and one of the sentiments. It really is a great stamp set as it reminds me of Summer!


The base of the card is made from a beige/brown card, I think you can see the colour of the card better in the second picture. I stuck a piece of  'Milk' coloured Foundation card from Creative Expressions to the inside of the card using scotch double sided tape, so that the writing would show up and used a matching cream envelope.


 Photograph World© Geoff Wilkinson - Design World © Lyn Wilkinson 
All Rights Reserved


I used a Woodware Magic Anti-Static pad and rubbed it all over the card which is used to help eliminate smudges and fingerprints on the card. I have to be honest and say we use this every time we heat emboss. Next I used a VersaMark Watermark Stamp Pad to stamp the bees and the sentiment and I started with the bees from the top doing one or two at a time. So I stamped, sprinkled the embossing powder, removed the excess and then used the heat tool, then repeated the process until all the bees were done. I did the 'You're the bees knees!' last as I didn't want to smudge anything!
                                           
Happy Crafting!
Dan
x