Showing posts with label Wild Rose Studio. Show all posts

Wednesday, 11 May 2016

FREE CRAFT DEMO DAY...SAVE THE DATE... Sunday 26th June 2016

Craft Demo Sunday - SAVE THE DATE IN THE DIARY!

Sunday 26th June 2016

Free Craft Demo Day, 12pm to 3pm at the shop in Wanstead.

Details of what we will be doing will follow but this is not a demo to be missed!

Refreshments will be served.


We look forward to seeing you.

84 Nightingale Lane, Wanstead, London E11 2EZ    
Telephone: 020 8530 1244

Friday, 1 April 2016

'In The Frame' Workshop....Look What We Made....


Photograph World© Geoff Wilkinson 
The crafty frame in the photograph above was the theme of our craft workshop that we held on Wednesday evening. We had a huge turn out on the night which we was great and everybody said that  they had a really wonderful evening. Thank you to everybody that attended, the variations in what everybody did looked brilliant.
We used lots of PaperArtsy paints and dies from Wild Rose Studio, along with Phill Martin background papers.
Below are pictures of what was made on the night. There are lots of photographs we hope you enjoy looking through them.

Lyn and Danielle
x x


Saturday, 25 July 2015

It's a White Wedding….


Photograph World© Geoff Wilkinson - Design World © Lyn Wilkinson All Rights Reserved

Happy Saturday! I hope there is lots of crafting going on this weekend.

We were recently asked to make a wedding card for somebody for a wedding they are attending this month. We really enjoy doing projects like this, because we think it is a compliment when somebody asks us to make something crafty for them. 

We thought it would make a great post on the blog, so you can see what we have been up to. It is another joint project from us and on this occasion we did not have a design in our minds before we started. All we knew was that we wanted it to be in either cream or white pearlised card and wanted to incorporate an embossing folder to add texture.

As you can see from the photograph above we went with a very simple colour theme. I think it is always very interesting when you limit the colour combination on a craft project and in this instance the  main colour is white with a hint of silver.

The card itself is made from Crafter's Companion Centura Pearl 300gsm card and the colour is 'Snow White Hint of Gold'. Using the same card and Creative Expressions Heart Lattice embossing folder we created the top layer. Once the card was embossed we then die cut out Sweet Dixie's Floral Heart Frame which created a heart shape in the card, again in the same Centura Pearl card. Behind the heart cut out we put a piece of silver swirl texture paper to create contrast. We then stuck down the embossed card layer with Scotch Double Sided tape and using STIX2 double sided foam pads stuck the heart die cut out over the top of the shape in the card to create a 3D effect.


Using the Wild Rose Studio Dies, 'Little Butterfly' and 'Peacock Butterfly', we die cut one of each in the Centura Pearl card and one of each in the silver swirl texture paper. Using glue dots along the bodies we stuck the silver paper butterflies over the Centura Pearl butterflies. The self adhesive pearls on the floral heart are white 8mm and the ones on the body of the butterflies (which hopefully you can see) are 3mm, both from Creative Expressions.

The sentiment proved the most difficult as we really could not decide what to do. We went quite subtle in the end and I think it works really well. We cut out a small circle die, stamped a Wild Rose Studio sentiment using a VersaMark Watermark stamp pad and heat embossed it using WOW!'s Metallic Silver embossing powder. We used the STIX2 Foam pads to stick it to the card, again creating a 3D effect.


Photograph World© Geoff Wilkinson - Design World © Lyn Wilkinson All Rights Reserved

Finally to add some finishing touches to make the card a little more special, we used a butterfly stamp from the 'Lovely Garden' stamp set by STAMPENDOUS! to stamp a butterfly on the inside of the card and the envelope in metallic silver. 

I hope you have enjoyed today's post.

Dan


Tuesday, 30 June 2015

PRETTY IN PINK….

 Photograph World© Geoff Wilkinson - Design World © Lyn Wilkinson All Rights Reserved


I always associate the colour pink with the word pretty, so when we decided to make a 'pretty card'  the colour theme was obvious. We also decided that we do not use background papers enough. So what do you get when you put the two together? You get the card in the above photograph….Pretty in Pink!

The card itself is made from smooth white 300gsm card, the background paper is from a Phill Martin Setimentally Yours Designer Paper Pad called Graceful Butterflies & Dragonflies. The paper in the pad is 8x8 inches and is 170gsm premium paper which makes it suitable for lots of different projects. It features 4 designs in 6 different colours and you get two sheets of each, so 48 in total and the pad also coordinates with other products from Phill's Graceful Range.

We used an embossing folder from Creative Expressions called Large Heart Lattice which is a favourite of ours as it gives a beautiful effect, which I put through our Spellbinders Grand Calibur. The paper was stuck to the card using Cosmic Shimmer Acrylic Glue, which I think is a must for any crafter as it is easy to use, adheres really well and is clear when it dries. To give the card a 3D look, you will see a middle panel was also created and stuck to the card using STIX2 Double Sided Foam Tape.

The dies used to create the toppers are both from Wild Rose Studio called 'Peacock Butterfly' and 'Flower Circle', to match the butterflies on the background paper. We used a selection of Tim Holtz Distress Ink Pads in various pink shades 'Victorian Velvet', 'Spun Sugar' and 'Picked Raspberry' to colour the die cuts, blending them with a Tim Holtz Mini Ink Blending Tool which is perfect for this type of work. 

Using WOW! Ultra High Clear Gloss Embossing Powder we gave the butterfly and the outer edge of the flower circle a 'ceramic' look. The middle of the 'Flower Circle' was then stamped with a sentiment stamp from from Wild Rose Studio using a Tim Holtz Distress Pad in 'Victorian Velvet'.  The 'Butterfly' and 'Flower Circle' were then attached to the card using STIX2 Foam Pads. Finally we added some Mini White Pearl Swirls from Creative Expressions to the body of the butterfly and to create it's antenna.

We hope you have enjoyed tonight's post and it has given you some ideas.
Lyn and Dan


Friday, 19 June 2015

All That Glitters….

 Photograph World© Geoff Wilkinson - Design World © Lyn Wilkinson All Rights Reserved

There is always something striking about using vibrant, bold colours against a black background, no matter what craft project it is you are working on. I find that they stand out beautifully against the dark background and I think the two examples in the above photograph are no exception. 

Using a VersaMark Watercolour Ink Pad we stamped a Sheena Douglass Poppy Stamp onto both pieces of black card, then used a WOW! Embossing Powder in "Metallic Rich Gold Regular". Once heated with a heat tool it created a great image from the stamp. For the main card standing up in the photograph, we decided to make it a "Just A Note" card using the same technique to create the sentiment. The sentiment is from a clear stamp set from Wild Rose Studio and they are really versatile to use on cards among other projects. Although a very simple card to make I think it looks very effective. 

The piece of card laying down was stamped and heat embossed in exactly the same way, however rather than leaving it plain we wanted to experiment and see what the poppies would look like "coloured in". For this technique we used a Perfect Pearls Pigment Powder in "Perfect Gold", which was mixed with water and applied with a paint brush. The experiment worked, it looked great once it had dried. I think it just shows you how versatile you can be when using your stamps and embossing powders.

One tip when working with stamps and embossing powders, is to use an Anti Static bag and wipe it across the surface before you start. It helps to eliminate smudges and fingerprints on your work.

Happy Crafting this weekend!
Dan
x


Sunday, 14 June 2015

The Theme of Tonight….The Beauty of Simple Die Cutting - Project Three

 Photograph World© Geoff Wilkinson - Design World © Lyn Wilkinson All Rights Reserved

Tonight is the last of the three projects in this series and I wonder if you can guess who had more influence in designing this card, based on the colour theme. If you follow the blog regularly you will definitely know! 

For the previous two cards we used dies designed by Sweet Dixie and Wild Rose Studio and we used different embossing folders as a contrast. The project in the photograph above is slightly different as it combines dies from both Wild Rose Studio and Sue Wilson at Creative Expressions. I have heard Sue Wilson say that she designs  her dies to work in conjunction with each other. I think that you can combine dies from different designers on your projects, which not only makes your projects more interesting but also means you get the most out of your dies.

The Butterfly dies used are the same as in the previous project, the "Peacock Butterfly" and "Little Butterfly" from Wild Rose Studio. 

The die at the bottom of the card was cut out in both black and white card using the Border die, from Sue Wilson's, Creative Expressions French Collection - Corner, Border & Tag die set. The set contains three dies. The white die cut was stuck over the black card using Cosmic Shimmer Acrylic glue. I hope that you can see from the photograph the shadow effect that this creates. The same technique was used in the top right hand corner of the card, this time using the Corner die from the set. I think both of these dies work really well with the delicate wings of the butterflies. 

Rangers Liquid Pearls in "Platinum Pearl" was used along the body of the butterfly to add some colour. Finally we stamped a sentiment from a stamp set by IndigoBlu called 'B.F.F', using a Rangers Archival "Jet Black" ink pad.

So that was the last of the projects in this series and as promised below are details of our next card making workshop. I hope you have enjoyed all the cards and reading about how they were made.

Happy Crafting,
Dan
x

Card Making Workshop - Theme: Die Cutting 
Sunday the 28th of June
12.30pm to 2.30pm
Cost £7.50 per person
(includes all the materials you need and of course tea, coffee and cake!)

Limited Spaces Available

To book your place, please call the shop on 0208 530 1244.


Saturday, 13 June 2015

The Theme of Tonight….The Beauty of Simple Die Cutting - Project Two

 Photograph World© Geoff Wilkinson - Design World © Lyn Wilkinson All Rights Reserved

Tonight's project features a variety of Speciality Dies from Wild Rose Studio. To start with we die cut both the "Peacock Butterfly" and "Little Butterfly" in a mix of the white and purple card to create a 3D effect as the main focus on the card. These are two of our favourite dies from Wild Rose Studio and work beautifully individually and together. 

At the bottom we used the "Woodland Border" die, which we cut out in white card and stuck it down with Cosmic Shimmer Acrylic glue. This glue is great to use and is how all the other die cuts were also stuck down. The die that you can see in the photograph that links in between the butterflies and woodland border is a die called "Oval Flower" again in white card, however instead of using the complete die, once it was cut out we cut off part of it to make it look like it was climbing out of the "Woodland Border". 

Rangers Liquid Pearls in "Lavender Lace" was used to bring out the detail of the middle of the flowers and the body of the butterfly. The slightly larger flower just above the sentiment was outlined with the "Lavender Lace"  and we added a Creative Expressions 5mm white pearl in the centre. The sentiment itself is also from a range by Wild Rose Studio, which was stamped with a Versacraft Ink Pad in "Wisteria"

I am hoping that you can see from the photograph that the top layer white card has some texture in it. This was done using and embossing folder called "Linear Leaves", which is new in 2015 from Creative Expressions.

I hope you have enjoyed looking at this project, I think the purple and white work particularly well together as a colour theme.

Back tomorrow for the last project in our series of three and remember we will be posting details on our upcoming card workshop.

Dan
x

Friday, 12 June 2015

The Theme of Tonight….The Beauty of Simple Die Cutting - Project One


   Photograph World© Geoff Wilkinson - Design World © Lyn Wilkinson All Rights Reserved
Hello,Happy Friday! So as the title says the theme of tonight is the beauty of simple die cutting and including tonight we will be posting details on the individual cards featured in the photograph above over three nights. 

For these projects the cards have been made using a range of dies from Wild Rose Studio, Sweet Dixie and Creative Expressions designed by Sue WilsonTo start this project series off, I wanted to say that each of the cards was made using 300gsm smooth white card and each of the card layers (the coloured card and the white card) was stuck down using Scotch Double Sided tape

I thought tonight I would start with the Fairy card, shown in the photograph below.

   Photograph World© Geoff Wilkinson - Design World © Lyn Wilkinson All Rights Reserved

The die used on this card is part of a set from Sweet Dixie called 'Fairy and Butterflies'. As well as the fairy, there are also two butterflies that make up this set although we have not used them here. You can cut, emboss and stencil with these Sweet Dixie Dies, so they are good for working with. 

In order to create some texture we used an embossing folder from Creative Expressions called 'Sparkle Square' on about a third of the top white card and picked out the middle of the alternate squares by using Rangers Liquid Pearls in 'Mint Green'. I know I am biased but up close the Liquid Pearls look really beautiful against the white card.  

A piece of thin white card was stuck down using Cosmic Shimmer Acrylic Glue above the embossed part of the card, mounted on turquoise card creating a two tone look. To finish the card off we added a sentiment using a clear stamp from Wild Rose Studio, stamped in a Versacraft Ink Pad 'Baby Blue' to give some contrast.

Remember to look out for the other cards over the next two nights and on the third night I will be posting details of our next card workshop. Can you guess what the theme will be?

Dan
x

Friday, 5 June 2015

Bespoke Sparkle Anyone?

  Design and photograph World © Lyn Wilkinson - All rights reserved

We have a lovely rep called Tanya from one of our suppliers who we get all things Cosmic Shimmer from, to stock in the shop. When we first started looking at what to stock at Craft Boutique at 84, we knew we had to have Cosmic Shimmer as a brand and Tanya was the person who told us how lovely their Sparkle Texture Paste was to use and also how versatile it can be. 

For 2015, one of the new colours launched that we have on sale at the shop is called 'Polar White'. What makes this colour so versatile is that it has no hint of colour in it like 'Aurora Sparkle' and 'Frosty Dawn', it is just white so is great to mix with paints, ink refills and dry glitter to create your own bespoke colours. Also Sparkle Texture Paste no matter what colour it is, is always beautifully sparkly. 


The Iris in the card above was created using 'Polar White' texture paste, mixed with various PaperArtsy paints, for example the stem and leaves are 'Hey Pesto',  through a stencil. She did this on a piece of smooth white stamping card which she stuck to the scalloped card using Scotch Double Sided Tape.

The dark blue border is light weight card embossed and stuck to the card again using the Scotch Double Sided Tape and the sentiment stamp is from Wild Rose Studio and was stamped using a Versa Craft 'Pale Lilac' ink pad.

If you have never used Cosmic Shimmer's Sparkle Texture Paste in your craft projects, I would definitely say it is worth trying to create great effects.

Have a lovely weekend and happy crafting,

Tuesday, 2 June 2015

I Couldn't Leave the Boys Out….

 Photograph World© Geoff Wilkinson - Design World ©  Danielle Wilkinson -  All Rights Reserved

I told you I wouldn't leave the boys out didn't I? So here I am with my second project using the 'Ornate Pram' Speciality Die from Wild Rose Studio. I used our 'Spellbinders Grand Calibur' to cut the die and again I have to say it did the job beautifully.

I used a smooth white 300gsm card for the base and also for the top layer with the pram die cutout. As I chose a pink and white colour theme for the baby girl card I posted on the blog on Friday, I decided to go for a blue and white colour theme for the baby boy card. As you can see from the photograph I used a blue and white striped card under the top layer and stamped the sentiment on white card also on top of a strip of the same blue and white card. I used 'Scotch Double Sided Tape' to stick all the layers. 

I die cut the 'Ornate Pram' in blue pearlised card along with another new Wild Rose Studio die for 2015 called 'Vivianna Corner', which as you can see I used on one of the top corners. To stick down the pram die cutout I used 'Cosmic Shimmer Acrylic Glue'. To stick down the 'Vivianna Corner' 
I used STIX2 foam pads, adding a 3D look to the project. 

The sentiment itself is made up of two stamps from Wild Rose Studio's 'Vivianna Greetings' clear stamp set, stamped with a Versa Craft 'Midnight' ink pad. I often like to create different layers in my projects to make them more interesting, so again I made this 3D by using the foam pads.

For the final touches this time I used some Creative Expressions 5mm white self adhesive pearls in the corner. In the centre of the wheels on the pram and the top of the 'Vivianna Corner' I added blue diamantes. Sparkly, I love it!

This card took a little longer to make than the baby girl card because as you can see it is bigger and there is more on it, even though the prams are in the same place on both. I just wanted to demonstrate that you can use the same die to create different looks.

Look out for a new project post on Friday night.

Happy Crafting!
Dan

You can find us at:
 'eightyfour' 
84 Nightingale Lane, 
Wanstead, 
London E112EZ 
Tel: 0208 530 1244  
www.craftboutique84.com


Saturday, 30 May 2015

Free Demo Day Sunday the 31st of May 2015

Sunday the 31st of May 2015

FREE DEMO DAY
(At our shop in Wanstead)
12.00pm to 3.00pm 

Come along and join us for an afternoon 
of everything crafty!

We will be showing some of the latest
products, plus demonstrating techniques
with samples to share.

Tea, Coffee and Cake!

For further information call the shop
on 0208 530 1244

The shop address is 84 Nightingale Lane, Wanstead, London E11 2EZ.

Friday, 29 May 2015

Here Comes the Girl….

 Photograph World© Geoff Wilkinson - Design World © Lyn Wilkinson All Rights Reserved

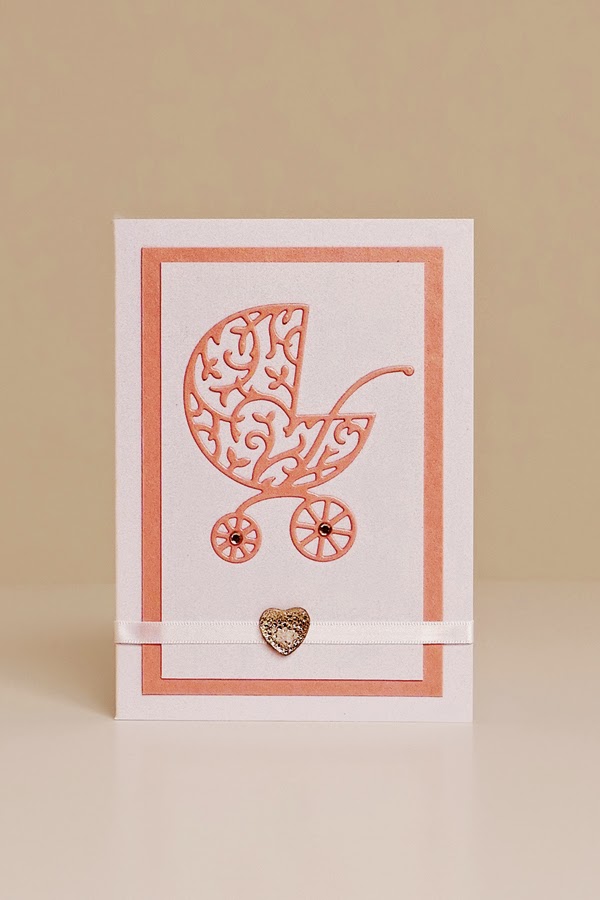
I am back as promised with another project using a Wild Rose Studio Speciality Die, this time it is the 'Ornate Pram' which is a newly released die in 2015. I used our 'Spellbinders Grand Calibur' to cut the die and I have to say it did the job beautifully.

As I chose to make a card for a new baby girl I decide the colour pink was a must, so as you can see used pink card to cut out the die and as a background layer. The pink card was pearlised, so I made the card itself and the embellished in 'Crafters Companion Fresh White Centura Pearl' card. I used 'Scotch Double Sided Tape' to stick all the layers of card and 'Cosmic Shimmer Acrylic Glue' to stick down the pram die. 

For the final touches I used some thin white satin ribbon and a 'Heart Sparkler' embellishment from Creative Expressions Finishing Touches range. I also couldn't resist adding a pale pink diamond to centre of each of the wheels on the pram as I love a bit of sparkle!

The card did not take long to make and I have to say I was really pleased with it. I couldn't leave the boys out could I? So look out for the post on Tuesday.

Also as a reminder we have our Free Demo Day at the shop in Wanstead starting at 12pm this Sunday the 31st. So if you are looking for some crafty inspiration pop in and see us. You can find us at 'eightyfour' 84 Nightingale Lane, Wanstead, London E112EZ tel: 0208 530 1244  www.craftboutique84.com

See you soon,
Dan


Tuesday, 26 May 2015

Words in Frame...

Photograph World© Geoff Wilkinson - Design World © Lyn Wilkinson All Rights Reserved

As some of you may know we also do framing at 'Eightyfour', so I decided to do a craft project using a white frame and black mountboard as a background (as most of you know black and white is one of my favourite colour combinations). 

Words are very popular and so I thought framed words would be nice to do. The die cuts that you see in the photograph are the 'Peacock Butterfly' and 'Little Butterfly' from Wild Rose Studio. The flowers are a combination of two dies by Sue Wilson at Creative Expressions called 'Delicate Daisies Complete Petals' and 'Delicate Daisies Open Petals'

Happy Crafting,
Lyn

Tuesday, 19 May 2015

Introducing Wild Rose Studio

  Design and photograph World © Lyn Wilkinson - All rights reserved

Wild Rose Studio is a UK papercraft company owned by a husband and wife team, who you can tell from looking and working with their designs are passionate about creating beautiful products.

We have been stocking their Speciality dies and stamps since opening Craft Boutique at 84 last year and have received great feedback from our customers who have bought the dies and stamps from us.

A few weeks ago on one of my posts I said that I loved black and white together as a colour combination on all things crafty. Well I am also a huge fan of blue and white together as I always think it looks crisp and fresh and that was my inspiration for this card. The base of the card in the photograph above was made using smooth white card, 300gsm. I then added a smaller layer of card in a cornflower blue and topped that with smooth white card again and used the partial die cutting technique on this layer to create the butterfly which is Wild Rose Studio's 'Peacock Butterfly' die. To stick the different layers of card together I used Scotch double sided tape, this is a new favourite product of ours and one we have recently started stocking in the shop.

I then used another Wild Rose Studio die new for 2015 called 'Olivetti Corner', this worked beautifully on two of the opposing corners of the card adding a real ornate feel to it. Using Rangers Liquid Pearls in 'Baby Blue', I decorated the body of each of the butterflies and the tops of the wings and the flowers on each of the corner dies. 

Finally I stamped the Happy Anniversary sentiment using a Versacraft ink pad in 'Sky Mist' which I find is a versatile colour when you have introduced blues and greys into a project. The clear stamp itself is also from Wild Rose Studio and I like to use them when I do not want a sentiment to look too over powering, especially on a card.

I hope you have enjoyed your introduction to Wild Rose Studio. Look out for more posts over the next few weeks that will feature more of their Speciality dies and stamps.www.craftboutique84.com

Happy Crafting,
Lyn


Saturday, 9 May 2015

SPRING SALE STARTING SUNDAY 10th MAY


WE ARE HAVING
A
SPRING SALE
AT OUR
WANSTEAD SHOP

UP TO 30% OFF ALL CRAFT PRODUCTS

SUNDAY 10th MAY TO SUNDAY 31st MAY 2015

THE SPRING SALE IS ONLY TAKING PLACE AT OUR SHOP IN WANSTEAD, THIS OFFER DOES NOT APPLY TO ANY PRODUCTS ON OUR WEBSITE.


Friday, 8 May 2015

Sheena's Perfect Partners


  Design and photograph world ©  Lyn Wilkinson - All rights reserved


Whether you are a fan of flowers or not when doing your craft projects, it is hard not to be a fan of the wonderful Sheena Douglass and her Wild Rose-Briar Stamp set and matching Wild Rose Die used on the card in the picture above. 

They are from Sheena's 'Perfect Partners' range and as soon as we saw them at the craft trade fair we visited in February, we knew we had to stock them. Not only are they easy to use, they are very versatile to work with and can be used to create some beautiful projects. The A5 unmounted stamp set includes 5 stamp images and 2 sentiments, retails at £9.99 and the die set containing 4 individual dies retails at £19.99. Both are available to buy from our shop in Wanstead (they will be on the website soon), we also stock other designs from the 'Perfect Partners' range.

To make the card, the images were stamped on Sheena Douglass White Smooth Stamping Card and  I used a Rangers Archival Wendy Vecchi 'Watering Can' ink pad for the stamping. If you have looked at previous posts on the blog you will know that there are times when I like to use a grey ink rather than a black which can sometimes look too harsh. I then cut out the stamps using our Spellbinders Grand Calibur die cutting machine.

For colouring the flowers and leaves I used various Tim Holtz Distress Ink Pads working with a Tim Holtz Mini Ink Blending Tool, which is great because it is small and round and easy to work with. Some of the Distress colours I used were 'Scattered Straw', 'Mowed Lawn', 'Seedless Preserves' and 'Victorian Velvet'. 

To make the centre of each of the flowers I used Rangers 'Daffodil' Liquid Pearls. I glued the leaves directly to the card using Cosmic Shimmer PVA glue, but I wanted the flowers to stand out so I stuck them to the card using Stix2 foam pads to create a 3D effect. Finally I stamped a sentiment from Wild Rose Studio's Birthday Circles clear stamp set (there are 6 different sentiment stamps in the pack) using a Versacraft Ink Pad in Spring Green.

Sorry for such a long post but I really wanted to give you as much detail as possible.

Look out for another project on Tuesday night. Also we will be posting details this weekend on our upcoming card making workshop.

Happy Crafting.
Dan

Friday, 1 May 2015

Lyn's Happiness Card

Design and Photograph World © Lyn Wilkinson - All rights reserved.

Those of you who know me, know I love black and white together as a colour combination on all things crafty. So when I decided to do the card pictured above I chose my favourite colour combo, introducing gold as the third colour. 

The white card itself is a 300gsm smooth card. The border stamp is new in the shop, it is called 'Floral Doodle Square'  and is a pre cut stamp from Stamps To Die For, decorated with gold foil. I then 3D mounted some black card in the centre of the square and in the middle of the card placed a butterfly using STIX2 foam pads, that I die cut from the 'Peacock Butterfly' die from Wild Rose Studio which I also decorated in gold foil. 

The writing is a favourite of mine and I have used it on a previous project, but I just love the words. It is a Woodware clear magic stamp called 'Happiness Is....', which I stamped using a Perfect Medium stamp pad and then embossed with WOW! 'Ebony' embossing powder.

I never tire of butterflies....
Happy Card Making,
Lyn