Saturday, 30 May 2015

Free Demo Day Sunday the 31st of May 2015

Sunday the 31st of May 2015

FREE DEMO DAY
(At our shop in Wanstead)
12.00pm to 3.00pm 

Come along and join us for an afternoon 
of everything crafty!

We will be showing some of the latest
products, plus demonstrating techniques
with samples to share.

Tea, Coffee and Cake!

For further information call the shop
on 0208 530 1244

The shop address is 84 Nightingale Lane, Wanstead, London E11 2EZ.

Friday, 29 May 2015

Here Comes the Girl….

 Photograph World© Geoff Wilkinson - Design World © Lyn Wilkinson All Rights Reserved

I am back as promised with another project using a Wild Rose Studio Speciality Die, this time it is the 'Ornate Pram' which is a newly released die in 2015. I used our 'Spellbinders Grand Calibur' to cut the die and I have to say it did the job beautifully.

As I chose to make a card for a new baby girl I decide the colour pink was a must, so as you can see used pink card to cut out the die and as a background layer. The pink card was pearlised, so I made the card itself and the embellished in 'Crafters Companion Fresh White Centura Pearl' card. I used 'Scotch Double Sided Tape' to stick all the layers of card and 'Cosmic Shimmer Acrylic Glue' to stick down the pram die. 

For the final touches I used some thin white satin ribbon and a 'Heart Sparkler' embellishment from Creative Expressions Finishing Touches range. I also couldn't resist adding a pale pink diamond to centre of each of the wheels on the pram as I love a bit of sparkle!

The card did not take long to make and I have to say I was really pleased with it. I couldn't leave the boys out could I? So look out for the post on Tuesday.

Also as a reminder we have our Free Demo Day at the shop in Wanstead starting at 12pm this Sunday the 31st. So if you are looking for some crafty inspiration pop in and see us. You can find us at 'eightyfour' 84 Nightingale Lane, Wanstead, London E112EZ tel: 0208 530 1244  www.craftboutique84.com

See you soon,
Dan


Tuesday, 26 May 2015

Words in Frame...

Photograph World© Geoff Wilkinson - Design World © Lyn Wilkinson All Rights Reserved

As some of you may know we also do framing at 'Eightyfour', so I decided to do a craft project using a white frame and black mountboard as a background (as most of you know black and white is one of my favourite colour combinations). 

Words are very popular and so I thought framed words would be nice to do. The die cuts that you see in the photograph are the 'Peacock Butterfly' and 'Little Butterfly' from Wild Rose Studio. The flowers are a combination of two dies by Sue Wilson at Creative Expressions called 'Delicate Daisies Complete Petals' and 'Delicate Daisies Open Petals'

Happy Crafting,
Lyn

Sunday, 24 May 2015

Look What Is New In Stock....Kaleidacolor Ink Pads

Photograph World© Geoff Wilkinson - All Rights Reserved

We are so excited to have Kaleidacolor Ink Pads in stock, both in the shop in Wanstead and on the website.

A Water Based Multi Colour Dye Ink Pad, they can be used on plastic, metal, shrink plastic, rubber, leather, polymer clay, laminated paper, coated paper, uncoated paper, photo, glass, porcelain, terracotta and cellophane. They come in a variety of unique colour combinations.

We will be demonstrating them on the Demo Day at the shop on Sunday the 31st of May, which starts at 12pm.

Lyn and Danielle


Saturday, 23 May 2015

It was lovely to see you

                                  Picture World © Geoff Wilkinson - Card © Lexi-All rights reserved

We wanted to say thank you to Lexi for coming to see us at the shop this afternoon and bringing the card that she made this morning. Lexi is the granddaughter of one of our customer's Janet and she absolutely loves crafting. 

Her card was absolutely beautiful and Lexi had designed and stamped it all herself. She had die cut shapes for the characters and added silver glitter in the middle of the stamps. 

We couldn't resist asking for a picture and although we do not run workshops for children we promised we would put her card on the blog. 

Lexi, it was lovely to see you today, enjoy crafting with nanny.

See you soon,
Lyn and Danielle
x


Friday, 22 May 2015

Just A Quickie….

                                                
Design and photograph World © Lyn Wilkinson - All rights reserved


Have you ever wondered what you can do with a rubber stamp, a black ink pad and Rangers Liquid Pearls in various colours? 

Well just take a look at the card in the photograph above. I like a lot of people today, text and email to say thank you or send a message to someone but I always think it is so much nicer when you send a card or when you receive one, especially when it is handmade. The nicest thing about crafting whether it be a card, tag or other projects is that it can be as simple or as complex as you want to make it. I think this card is really simple but effective and I love the bright colours among the contrast of the back and white.


I used a Clear Magic Stamp from Woodware to make the images and 'Just a note' sentiment, which I stamped with a Rangers Archival ink pad in 'Jet Black' on 300gsm smooth white card. Once the ink was dry I applied the Rangers Liquid Pearls in 'Daffodil', 'Ruby Red', 'Hydrangea', 'Key Lime', 'Baby Blue'  and a couple more!

This card is really simple to produce and you could set up a mini production line to do a few for your card box, that way you would have some in reserve for when you needed them.

I hope you like it. I had fun making it.

Have a lovely time crafting this weekend and look out for some extra posts on the blog!
Back with another project on Tuesday.
Dan


Tuesday, 19 May 2015

Introducing Wild Rose Studio

  Design and photograph World © Lyn Wilkinson - All rights reserved

Wild Rose Studio is a UK papercraft company owned by a husband and wife team, who you can tell from looking and working with their designs are passionate about creating beautiful products.

We have been stocking their Speciality dies and stamps since opening Craft Boutique at 84 last year and have received great feedback from our customers who have bought the dies and stamps from us.

A few weeks ago on one of my posts I said that I loved black and white together as a colour combination on all things crafty. Well I am also a huge fan of blue and white together as I always think it looks crisp and fresh and that was my inspiration for this card. The base of the card in the photograph above was made using smooth white card, 300gsm. I then added a smaller layer of card in a cornflower blue and topped that with smooth white card again and used the partial die cutting technique on this layer to create the butterfly which is Wild Rose Studio's 'Peacock Butterfly' die. To stick the different layers of card together I used Scotch double sided tape, this is a new favourite product of ours and one we have recently started stocking in the shop.

I then used another Wild Rose Studio die new for 2015 called 'Olivetti Corner', this worked beautifully on two of the opposing corners of the card adding a real ornate feel to it. Using Rangers Liquid Pearls in 'Baby Blue', I decorated the body of each of the butterflies and the tops of the wings and the flowers on each of the corner dies. 

Finally I stamped the Happy Anniversary sentiment using a Versacraft ink pad in 'Sky Mist' which I find is a versatile colour when you have introduced blues and greys into a project. The clear stamp itself is also from Wild Rose Studio and I like to use them when I do not want a sentiment to look too over powering, especially on a card.

I hope you have enjoyed your introduction to Wild Rose Studio. Look out for more posts over the next few weeks that will feature more of their Speciality dies and stamps.www.craftboutique84.com

Happy Crafting,
Lyn


Sunday, 17 May 2015

What A STAMPENDOUS! Day We Had Today….

All pictures World © Geoff Wilkinson - All rights reserved
Today we had a card making workshop at our Gallery
in Wanstead and what a STAMPENDOUS! day we had. The sun was shining, the craft room was bright and airy, the refreshments were well received and we had a lovely group of ladies who spent the afternoon crafting. 

The theme of today was STAMPENDOUS! Jumbo Rubber Cling Sets and matching dies, to colour in we used a mixture of Tim Holtz Distress Ink pads, PaperArtsy Fresco Finish paints, Cosmic Shimmer Drawing Inks and in some cases we used WOW! Clear Gloss-Ultra High embossing powder. You can see some of the beautiful results for yourself in the photographs.


We will be posting more workshop dates soon, in the meantime we are having a Free Demo Day on Sunday the 31st of May between 12pm and 3pm. Come along and join us for an afternoon of everything crafty! We will be showing some of the latest products, plus demonstrating techniques with samples to share.

There will be Tea, Coffee and Cake! We look forward to seeing you.


Friday, 15 May 2015

PaperArtsy Is The Bee's Knees….

                             Design and photograph World © Lyn Wilkinson - All rights reserved


Firstly I have to apologise for this post going out later tonight that I said it would on Tuesday's post, but we have been very busy bees (I know, I know, not a great joke). 

We have lots of lovely suppliers at Craft Boutique at 84 and PaperArtsy is no exception. As you can see from the photograph above, they produce great products for all craft projects, working in conjunction with some great designers. 

The newly released A5 JOFY rubber stamp set from PaperArtsy, JOFY Collection 30 is so much fun to work with. Designed by Jo Firth-Young it contains nine stamps individually trimmed on EZ mount. I wanted to try out the new postcard tags (available in manila and white) that we are now selling in the Wanstead shop and online. I used the honeycomb stamp with a Versafine 'Vintage Sepia' ink pad, to create the background and then combined that with one of the text stamps which I stamped using Rangers Archival 'Watering Can' and lastly added some of the smaller bees using a Rangers Archival 'Jet Black' ink pad.

I then stamped the larger bee, beehive and both sizes in the honeycomb stamps. Then I coloured them in using  some of the PaperArtsy Fresco Finish Acrylic paints. I used 'Tango' and 'Yellow Submarine' to colour the bodies of all the bees, 'Chocolate Pudding' and 'Brown Shed' for the beehive and a mixture of 'Pumpkin Soup' with some other shades of brown for the honeycomb pieces. I applied all the paint using a water brush, which at the moment is my favourite way of working with the paint to create shading.

I cut out all the images I had stamped, covering the  large honeycomb shapes in Rangers Glossy Accents giving them a shine to contrast against the smaller shapes. Finally I used STIX2 foam pads to create a 3D effect and stuck all of my cut outs to the postcard tag.

I was really pleased with the finished tag, I had been wanting to use Jo's bees for a few weeks, so was finally excited to be able to do a project. It reminds me that Summer is on it's way!

I hope you have enjoyed tonight's project, look out for some exciting posts over the next few days.
Dan


Tuesday, 12 May 2015

It Certainly Is STAMPENDOUS!

                                           Design and photograph World © Lyn Wilkinson - All rights reserved


Last week we posted a project where I had used some of the latest products to come into the shop, a Jumbo Cling Rubber Set and co -ordinating die from STAMPENDOUS! They really are great to work with, so I have used another one for tonight's post. This time it is the 'Hummingbirds' set as shown in the picture above. 

I stamped the flower and leaf image directly onto a light green piece of lightweight card which using Scotch Double Sided tape (this is used by Sue Wilson on most of her craft projects and has recently become a favourite of ours) I stuck it to the white card itself, which is a 300gsm smooth card


I then stamped and die cut some additional flowers and a hummingbird. For all the stamping I used a Rangers Archival Wendy Vecchi 'Watering Can' ink pad to create a more subtle look. For colouring the flowers I die cut, I used various Tim Holtz Distress Ink Pads in 'Seedless Preserves',    'Victorian Velvet' and 'Picked Raspberry' working with a Tim Holtz Mini Ink Blending Tool, which is great because it is small and round and easy to work with. 

A technique I like to use is highlighting the centre of the flowers with a small amount of yellow, which I did by using Rangers 'Daffodil' Liquid Pearls. I simply squeezed a small amount in the middle of each flower and dabbed it off immediately with kitchen towel. It leaves traces of the yellow behind, which is very easy to do but very effective. 

To colour the hummingbird I used a variety of 'PaperArtsy Fresco Acrylic Chalk' paints such as 'Hey Pesto' and the newly released 'Blue Glass' applied with a water brush. I also used various PaperArtsy paints in green and pinks to colour the leaves and flowers I stamped onto the green card, again using a water brush which is a great way to blend colours. 


I wanted the additional flowers and hummingbird to stand out more so I used Rangers Inkssentials Glossy Accents which created a beautiful shine. I stuck the flowers and hummingbird to the light green background paper using Stix2 foam pads to create a 3D effect. Finally for some finishing touches, I put a small pink self adhesive pearl in the middle of each flower and used a white pearl in the bird's eye.

The wording is part of a rubber stamp set from PaperArtsy, E Lin Brown 06 which I stamped with Versacraft Ink Pad in Spring Green. This stamp set contains 7 different sentiments individually machine trimmed on EZ mount and retails at £19.99, available from our shop in Wanstead and on our website.

I hope you have enjoyed tonight's post, we will be posting another project on Friday evening at 6pm and it really is 'the bee's knees….', that is a little clue. 

Happy Crafting!

Dan

Sunday, 10 May 2015

CARD MAKING WORKSHOP - SUNDAY 17TH MAY 2015


SUNDAY 17th of MAY 2015

CARD MAKING WORKSHOP

Using New Dies and Stamps from 

STAMPENDOUS!

12.20pm to 2.30pm

Cost: £7.50 per person
(includes all the materials you need and of course tea, coffee and cake!)

Limited spaces available.

To book your place, please call the shop on 0208 530 1244.


Saturday, 9 May 2015

SPRING SALE STARTING SUNDAY 10th MAY


WE ARE HAVING
A
SPRING SALE
AT OUR
WANSTEAD SHOP

UP TO 30% OFF ALL CRAFT PRODUCTS

SUNDAY 10th MAY TO SUNDAY 31st MAY 2015

THE SPRING SALE IS ONLY TAKING PLACE AT OUR SHOP IN WANSTEAD, THIS OFFER DOES NOT APPLY TO ANY PRODUCTS ON OUR WEBSITE.


Friday, 8 May 2015

Sheena's Perfect Partners


  Design and photograph world ©  Lyn Wilkinson - All rights reserved


Whether you are a fan of flowers or not when doing your craft projects, it is hard not to be a fan of the wonderful Sheena Douglass and her Wild Rose-Briar Stamp set and matching Wild Rose Die used on the card in the picture above. 

They are from Sheena's 'Perfect Partners' range and as soon as we saw them at the craft trade fair we visited in February, we knew we had to stock them. Not only are they easy to use, they are very versatile to work with and can be used to create some beautiful projects. The A5 unmounted stamp set includes 5 stamp images and 2 sentiments, retails at £9.99 and the die set containing 4 individual dies retails at £19.99. Both are available to buy from our shop in Wanstead (they will be on the website soon), we also stock other designs from the 'Perfect Partners' range.

To make the card, the images were stamped on Sheena Douglass White Smooth Stamping Card and  I used a Rangers Archival Wendy Vecchi 'Watering Can' ink pad for the stamping. If you have looked at previous posts on the blog you will know that there are times when I like to use a grey ink rather than a black which can sometimes look too harsh. I then cut out the stamps using our Spellbinders Grand Calibur die cutting machine.

For colouring the flowers and leaves I used various Tim Holtz Distress Ink Pads working with a Tim Holtz Mini Ink Blending Tool, which is great because it is small and round and easy to work with. Some of the Distress colours I used were 'Scattered Straw', 'Mowed Lawn', 'Seedless Preserves' and 'Victorian Velvet'. 

To make the centre of each of the flowers I used Rangers 'Daffodil' Liquid Pearls. I glued the leaves directly to the card using Cosmic Shimmer PVA glue, but I wanted the flowers to stand out so I stuck them to the card using Stix2 foam pads to create a 3D effect. Finally I stamped a sentiment from Wild Rose Studio's Birthday Circles clear stamp set (there are 6 different sentiment stamps in the pack) using a Versacraft Ink Pad in Spring Green.

Sorry for such a long post but I really wanted to give you as much detail as possible.

Look out for another project on Tuesday night. Also we will be posting details this weekend on our upcoming card making workshop.

Happy Crafting.
Dan

Tuesday, 5 May 2015

A Tropical Combination

                                 Design and photograph Word © Lyn Wilkinson - All rights reserved


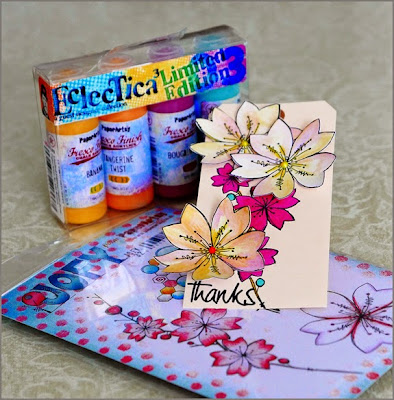
We are huge fans of PaperArtsy at Craft Boutique at 84, stocking their full range of Fresco Finish Acrylic Chalk paints, a large selection of rubber stamps and other PaperArtsy 'crafty stuff'. When there are new products available we love to order them in and of course try them out!  Pictured above is the most recent Limited Edition set of paints by Lin Brown. Fun, bright and versatile, from what I understand inspired by a trip Lin took, there are four colours in the set and they are called 'Banana', 'Tangerine Twist', 'Caribbean Sea' and 'Bougainvillea'. The set retails at £15.60 and is available to buy from our website or shop in Wanstead and being Limited Edition, they are only available while stocks last.

Also in the picture is a fabulous set of new stamps from Jo Firth-Young, comprising of five stamps individually trimmed and mounted on EZ mount. The set called JOFY Collection 32 has a butterfly, two different types of flowers, a honeycomb shape and 'thanks' wording and is priced at £19.99 from Craft Boutique at 84.

We really wanted to combine Jo's flowers in the stamp set with Lin's paints to give a tropical feel. As the paints are so versatile, using a water brush with them on the cut out flowers you can see that they create a very different effect to when they are not watered down, as you can see from the bright pinks and blues on the base of the Manila Tag. The cut out flowers have been finished off by using Rangers Liquid Pearls in the centre of them and then glueing them to the Manila Tag with Cosmic Shimmer Acrylic Glue.

This was one of our favourite projects which we did last week because the products are great to work with, we hope you like it too.

Look out for more ideas and another 'crafty' project on Friday night.

Lyn and Danielle


Friday, 1 May 2015

Lyn's Happiness Card

Design and Photograph World © Lyn Wilkinson - All rights reserved.

Those of you who know me, know I love black and white together as a colour combination on all things crafty. So when I decided to do the card pictured above I chose my favourite colour combo, introducing gold as the third colour. 

The white card itself is a 300gsm smooth card. The border stamp is new in the shop, it is called 'Floral Doodle Square'  and is a pre cut stamp from Stamps To Die For, decorated with gold foil. I then 3D mounted some black card in the centre of the square and in the middle of the card placed a butterfly using STIX2 foam pads, that I die cut from the 'Peacock Butterfly' die from Wild Rose Studio which I also decorated in gold foil. 

The writing is a favourite of mine and I have used it on a previous project, but I just love the words. It is a Woodware clear magic stamp called 'Happiness Is....', which I stamped using a Perfect Medium stamp pad and then embossed with WOW! 'Ebony' embossing powder.

I never tire of butterflies....
Happy Card Making,
Lyn